Why the Right EPDM Roof Patch Can Save Your Building From Costly Damage
An EPDM roof patch is the fastest, most cost-effective way to stop a rubber roof leak before it becomes a major problem. Here are the top options available right now:
| Product | Best For | Price Range | Where to Buy | |
|---|---|---|---|---|
| RoofKit EPDM Patch Kit | All-in-one small repairs | ~$50-80 | Lowe’s, Amazon | |
| Seal Trust EPDM Patch Kit | Small holes and tears | ~$30-60 | Menards | |
| Dicor EPDM Repair Membrane | RV and flat roof repairs | ~$81.75 (6″x25′ roll) | Home Depot | |
| Quick Roof EPDM Patch Kit | Budget-friendly spot repairs | ~$15-18 | True Value, Amazon | |
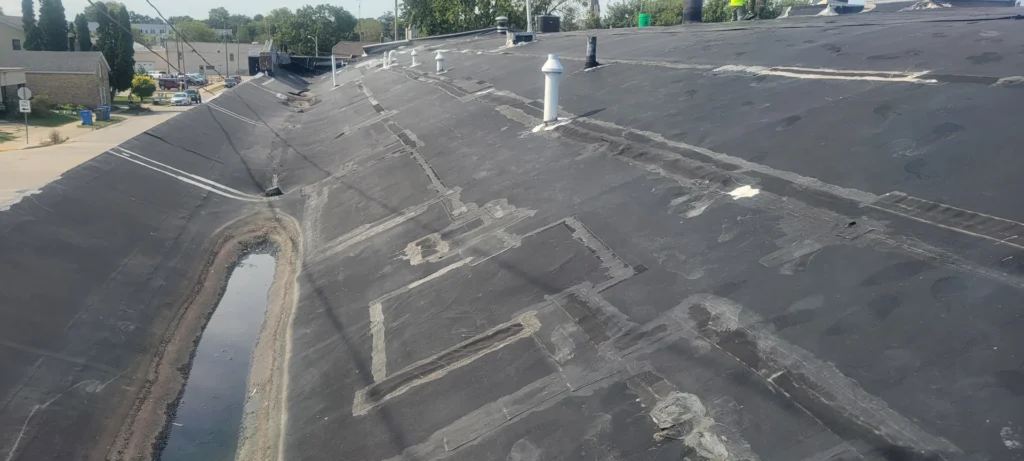
| CentiMark EPDM Repair Kit | Comprehensive commercial repairs | ~$148.50 | Direct/online | EPDM is the black synthetic rubber membrane you’ll find covering most commercial flat roofs. It’s tough and long-lasting — but Wisconsin’s freeze-thaw cycles, pooling water, and UV exposure can all punch holes in it over time. |
When that happens, water doesn’t wait. A small crack or puncture can quietly saturate your building’s insulation, damage interior assets, and turn a $50 repair into a $50,000 problem.
The good news? Many EPDM leaks can be stopped quickly with the right patch kit — no contractor required for small repairs.
I’m Josh Yutzy, and our team at Yutzy Roofing Service has been repairing and restoring EPDM roofs across Wisconsin and beyond since 1995 — including hundreds of EPDM roof patch jobs on commercial flat roofs just like yours. In this guide, we’ll walk you through the best products on the market and exactly how to use them.

Essential Components of a Professional EPDM Roof Patch Kit
If you are heading to a local retailer in Marshfield, Appleton, or Madison to grab a repair kit, you need to know what’s inside. A high-quality EPDM roof patch isn’t just a piece of rubber and some glue. Because EPDM is an “inert” material, standard adhesives won’t stick to it for long. You need a chemical bond.
A professional-grade kit should contain these essential items:
- Cured EPDM Patches: Usually 6-inch or 8-inch circles or squares. These are “fully cured,” meaning they won’t shrink or degrade quickly once applied.
- Seam Primer: This is the most critical component. The primer “activates” the surface of the old roof, allowing the patch to fuse to it.
- Scrubbie Pad: A specialized abrasive pad used to clean the membrane and work the primer into the rubber.
- Steel Seam Roller: This tool is used to apply heavy pressure to the patch, ensuring all air bubbles are removed and the adhesive is fully engaged.
- Membrane Cleaner/Solvent: To remove the “carbon black” dust and atmospheric grime that accumulates on EPDM over the years.

Choosing the Right EPDM Roof Patch for Your Facility
Not all patches are created equal. When browsing options, you’ll see “peel-and-stick” versus “glue-down” varieties. For most DIY commercial repairs, we recommend the peel-and-stick (self-adhesive) variety. These are factory-laminated with a high-tack tape backing that provides a more consistent seal than liquid adhesives applied in the field.
If you are dealing with a leak at a “T-joint” (where three pieces of rubber meet), look for a kit that includes T-joint covers. These are thicker, more flexible patches designed to conform to the uneven ridges of a seam. For more complex issues, you might need to look into Rubber Roofing Repair Renewing And Reinforcing Your Epdm Roofing System to ensure your facility stays dry through the next Wausau winter.
Compatibility with TPO and Metal Surfaces
One interesting thing about modern EPDM roof patch kits, like those from Quick Roof or Dicor, is their versatility. While they are designed for EPDM, many of these EPDM-based adhesives will also bond to:
- TPO and Hypalon: Other common single-ply membranes.
- Metal: Great for patching rusted-through spots in gutters or around metal flashings.
- Modified Bitumen: Though not ideal, they can provide a temporary stop-gap for asphalt-based roofs.
However, a word of caution: while a patch might stick to multiple surfaces, the expansion and contraction rates of metal versus rubber are very different. For long-term solutions on larger commercial buildings, we often recommend EPDM restorations which provide a seamless, monolithic coating over the entire structure.
Step-by-Step: How to Apply an EPDM Roof Patch Correctly
Applying an EPDM roof patch is a bit like applying a giant, industrial-strength Band-Aid. If the “skin” (the roof) isn’t clean, the Band-Aid will fall off the first time it gets wet. In Wisconsin, where we deal with heavy snow and ice, a poorly applied patch will fail in months, not years.
Preparing the Surface for an EPDM Roof Patch
Preparation is 90% of the job. EPDM naturally “exudes” carbon black—that fine black dust that gets on your hands when you touch an old rubber roof. If you try to stick a patch to that dust, it will fail.
- Step 1: Scrubbing: Use a specialized EPDM cleaner or a high-quality solvent. Use your scrubbie pad to agitate the surface until the membrane looks dark and clean.
- Step 2: Primer Application: Apply a thin, even coat of seam primer. Do not skip this! The primer creates a “tack” that the patch needs to grab onto.
- Step 3: The Finger Test: Wait for the primer to flash off (evaporate). Touch it with a clean finger; if it’s tacky but doesn’t “string” or stick to your finger, it’s ready. This timing varies based on atmospheric moisture—it might take 5 minutes in a dry Eau Claire breeze or 15 minutes in a humid Green Bay afternoon.
For a deeper dive into professional-level prep, you can learn about EPDM roof restoration near Madison WI.
Applying the Membrane and Sealing Edges
Once the surface is prepped, it’s time for the “stick” part of peel-and-stick.
- Centering: Ensure your patch is at least 2 inches larger than the hole in every direction. If the hole is 1 inch wide, your patch should be at least 5 inches wide.
- Peeling: Remove the release paper carefully. Try not to touch the adhesive with your gloves or fingers.
- Rolling: Start from the center of the patch and roll outward with your seam roller. Use significant pressure. You want to see the adhesive slightly “bleed” out the edges—this is a sign of a good mechanical bond.
- Lap Sealant: For an extra layer of protection, apply a bead of EPDM lap sealant (caulk) around the entire edge of the patch. This prevents water from “lifting” the edge of the patch during freeze-thaw cycles.
Understanding these steps helps you realize the top benefits of EPDM roof restoration when small patches are no longer enough to keep up with aging seams.
Investing in Quality EPDM Repair: Professional Materials and Service
There is a significant difference between the $15 EPDM roof patch you find at a local hardware store and the commercial-grade materials we use at Yutzy Roofing Service.
Retail kits are designed for small “spot” repairs—think of a puncture from a fallen branch or a dropped tool. They are great for an immediate fix. However, commercial-grade adhesives and membranes are formulated for higher durability and better resistance to ponding water.
When you hire a professional for EPDM repair, you aren’t just paying for the patch; you’re paying for:
- Expert Inspection: We often find that a leak at “Point A” is actually caused by a failure at “Point B” ten feet away.
- Advanced Adhesives: We use primers and cleaners that aren’t typically available to the general public.
- Warranty Protection: Our repairs are backed by our reputation, and our full restoration systems come with an up to 18-year non-prorated renewable warranty.
In the long run, investing in high-performance materials prevents the “patch-on-patch” cycle where you’re back on the roof every six months.
When to Choose DIY Patching vs. Professional Restoration
When is a DIY EPDM roof patch enough, and when do you need to call us in Marshfield or Fond Du Lac?
Choose DIY Patching if:
- You found a single, clear puncture or cut.
- The rest of the roof membrane is in good, flexible condition.
- The leak is not near a complex flashing or HVAC unit.
- You are comfortable working on a roof safely.
Choose Professional Restoration if:
- Multiple Leaks: If you’re playing “whack-a-mole” with patches, the membrane is likely reaching the end of its life.
- Seam Failures: When the long factory seams start to pull apart, a small patch won’t fix the underlying tension issue.
- Membrane Shrinkage: EPDM can shrink over time, pulling away from the edges of the building. This requires professional “bridging” or restoration.
- Large Scale Damage: For leaks affecting large areas of your facility, a commercial EPDM restoration system is a much smarter investment.
At Yutzy Roofing Service, we specialize in taking these aging roofs and making them better than new with our spray foam and fluid-applied coatings, often saving you the massive cost of a full tear-off.
Frequently Asked Questions about EPDM Repairs
How long does a typical EPDM patch last?
A well-applied peel-and-stick EPDM roof patch can last 5 to 10 years. However, its lifespan depends heavily on surface preparation. If the roof wasn’t cleaned and primed correctly, the patch might lift within a single season.
What are the Prop 65 warnings on EPDM repair kits?
You’ll often see California’s Prop 65 warnings on these kits because the primers and adhesives contain chemicals like toluene or petroleum distillates. These are standard in the roofing industry but should be handled with care—always wear gloves and work in well-ventilated areas.
Can I apply a patch in freezing temperatures?
It is difficult. Most EPDM primers and adhesives need to be at least 40°F (and rising) to work correctly. In a Wisconsin winter, you may need to use a heat gun to gently warm the membrane and the patch adhesive to get them to bond. For emergency winter repairs, it’s usually best to call a professional who has the equipment for cold-weather applications.
Conclusion
A leaky roof is a threat to your business, but it doesn’t always require a total replacement. By using a high-quality EPDM roof patch kit and following the proper steps—cleaning, priming, and rolling—you can extend the life of your commercial asset and protect your interior from water damage.
However, patches are often a temporary fix for a larger aging process. If your roof is consistently giving you trouble, it might be time to move beyond the Band-Aid. We serve businesses across Madison, Appleton, Wausau, and the surrounding areas with long-term, warranted solutions.
Don’t let a small leak turn into a structural disaster. Whether you need a simple repair or a full system overhaul, get an EPDM roof restoration near Madison WI and give your building the protection it deserves.
