

Identifying Signs and Causes to Safely Locate a Roof Leak
To successfully patch a leak in your roof, you first have to figure out where the water is actually entering. The indoor drip location is almost never directly beneath the exterior hole because water loves to travel along structural beams, conduits, and insulation before dripping down onto your ceiling tiles.
Keep an eye out for early warning signs both inside and outside the building:
- Interior Signs: Discolored ceiling tiles, dark water stains on walls, peeling paint, musty odors, or damp insulation in utility spaces.
- Exterior Signs: Cracking around roof vents, open seams on flat membranes, cracked pipe boots, or leftover unsealed holes from removed equipment like satellite dish brackets or HVAC mounts.
When tracing a leak, start by using a bright flashlight in the space above your ceiling tiles or attic space. Look for water trails, mold, or rust lines on framing member metal. Follow these signs upward to the highest wet point.
If you can’t find the entry point visually, you can perform a hose test. Have one person stand on the roof with a garden hose while a second helper stays inside with a flashlight watching for incoming moisture. Run water slowly over lower suspected areas first—such as around pipe boots or step flashings—and slowly move upward.
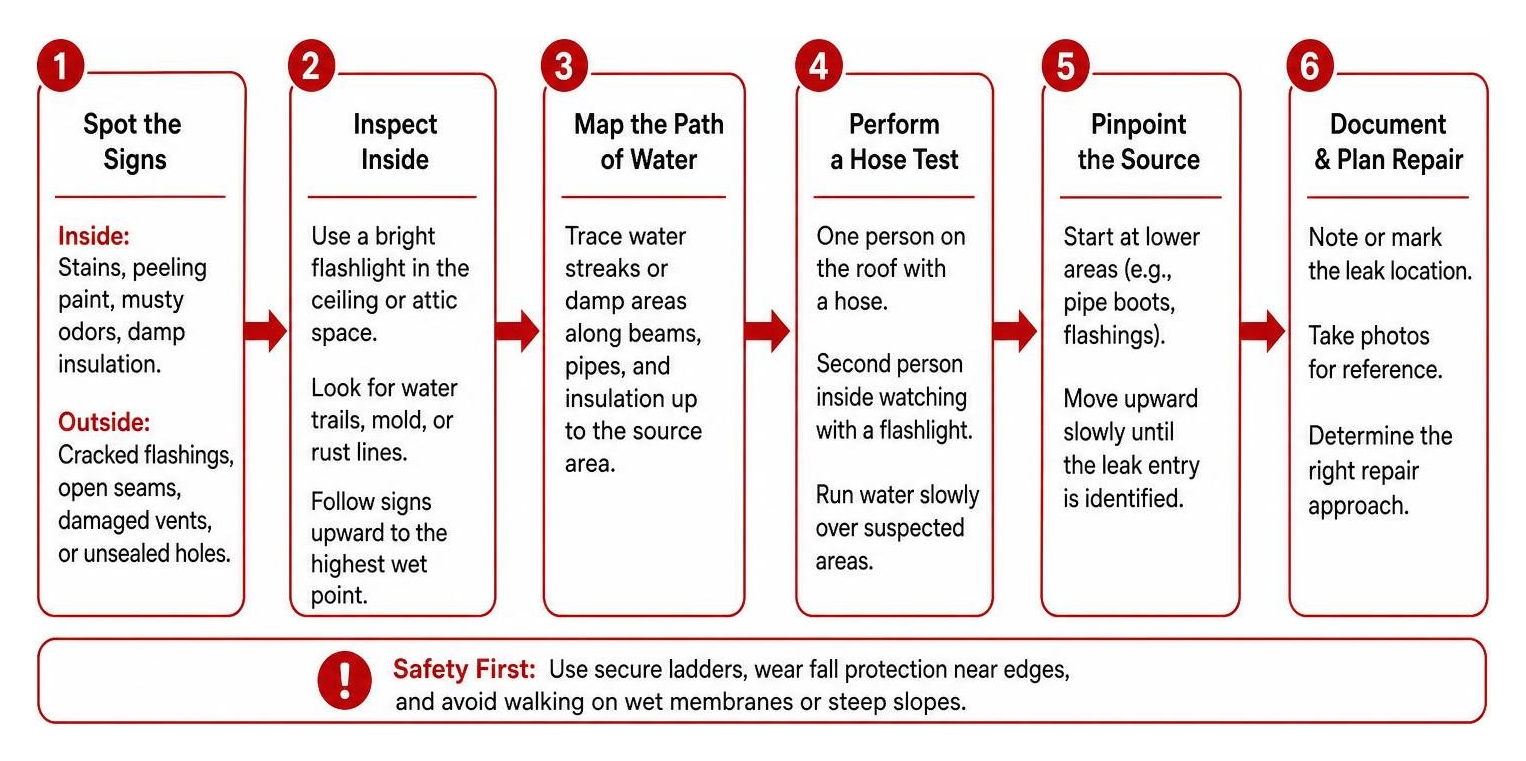
Always prioritize safety during inspection. Work from secure ladders, wear fall protection equipment when working near edges, and avoid walking on wet single-ply membranes or steep slopes. If you are dealing with a broader issue, exploring 6 Ways To Fix Your Leaking Roof will help you determine whether a quick patch or a broader approach is necessary.
Emergency Mitigation and Interior Leak Fixes
If heavy rain or hazardous weather makes going onto the roof deck unsafe, you must focus on interior containment to prevent further building damage.
Start by collecting dripping water using heavy-duty buckets or plastic containers. Lay down absorbent towels around the containers to catch splash droplets. If trapped water causes ceiling drywall or ceiling tiles to bow downward, poke a small release hole in the lowest point of the bulge using a screwdriver. Draining this trapped water safely into a bucket prevents a sudden, catastrophic ceiling collapse.
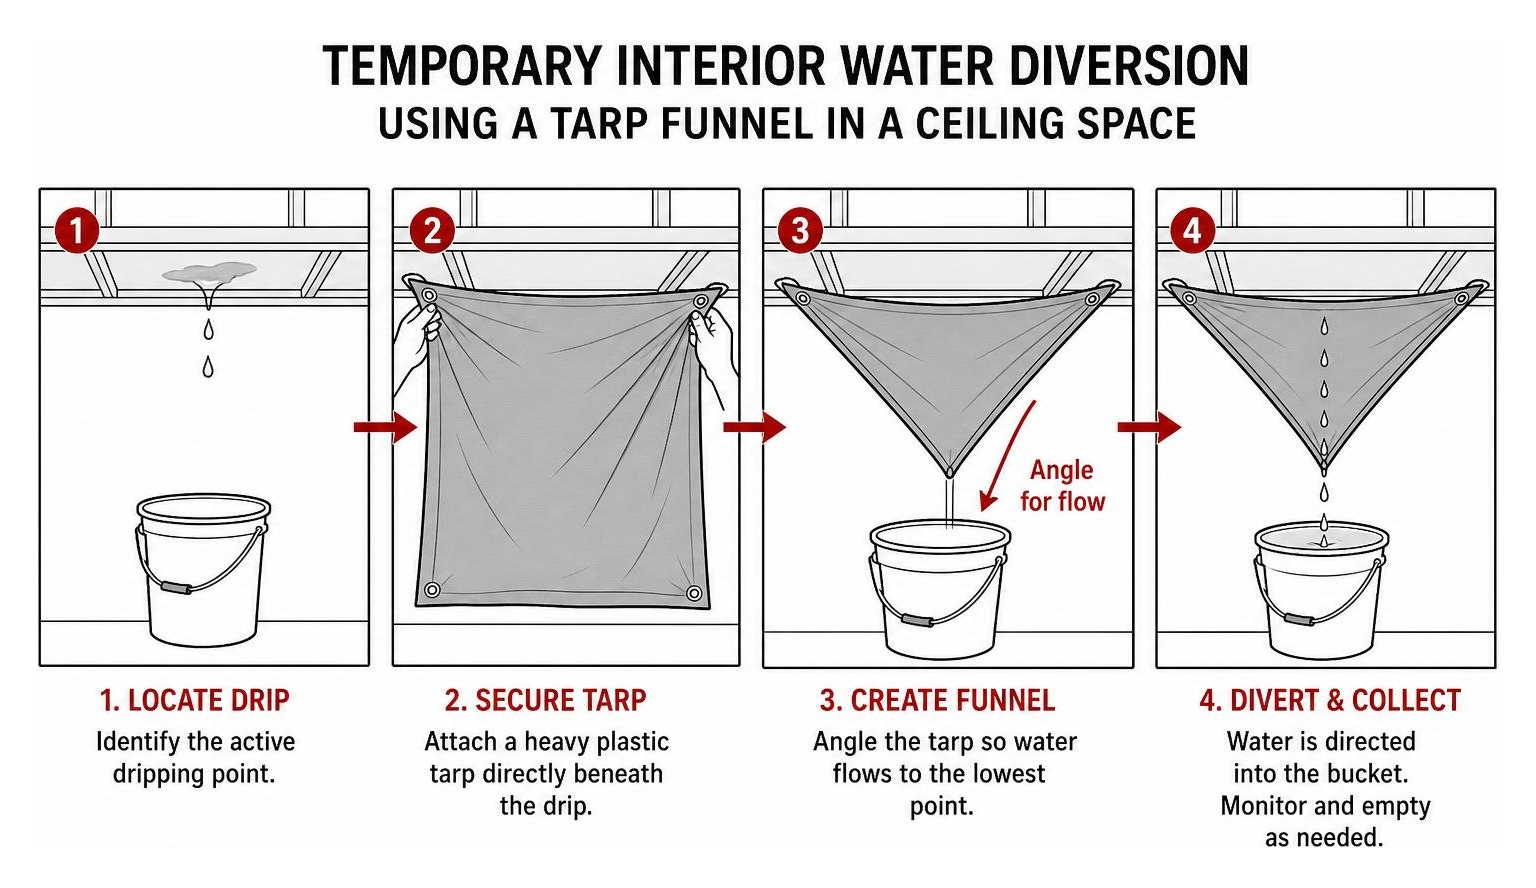
If you can safely access the ceiling space above the leak:
- Locate and dry: Use shop towels or a wet/dry vacuum to clear pooling water off rafters or structural steel.
- Apply temporary interior sealant: Put heavy-duty roofing tape or quick-curing polyurethane sealant over the interior seam or deck seam where water is creeping through.
- Set up a tarp funnel: Secure a heavy plastic sheet or tarp directly underneath the dripping point on the underside of the deck, angling it down into a bucket to catch stray moisture.
That sealing a roof from the inside is strictly a temporary measure. Water will continue to collect within your roofing system until you apply a proper patch on the outside. For more guidance on managing indoor drips safely, check out our guide on Stop The Drip A Guide To Interior Roof Repairs.
Best Sealants and Materials to Patch Leak in Roof
Selecting the right patching material depends on your roof deck type, weather conditions, and ambient temperatures. Using the wrong sealant can cause premature adhesion failure, especially on specialized commercial membranes.
Here are the primary patching materials used in commercial and flat roof maintenance:
- Rubberized Asphalt Cement: Excellent for asphalt composition, modified bitumen, and metal roofs. High-performance formulations like HE208 – WET PATCH® ROOF LEAK REPAIR feature 100% wet surface adhesion under ASTM D3409 standards. This means you can apply it directly into standing water or during heavy rainfall in temperatures ranging from 0°F to 120°F.
- Tripolymer Sealants: Flexible clear sealants such as WET/DRY PATCH AND SEAL stick well to metal, PVC, cedar, and concrete. They can be applied in temperatures as cold as 25°F up to 100°F.
- Silicone Patching Compounds: Stand-alone, high-solids silicone sealants (such as GacoPatch) offer superior protection against standing or ponding water. Silicone does not chalk or degrade under continuous UV exposure or standing water, making it a reliable choice for flat roofs.
- Elastomeric Patch Mastics: Water-based or solvent-borne elastomeric acrylic compounds offer rubber-like movement, expanding and contracting with building movement. They perform best when applied in warmer weather between 40°F and 100°F.
| Sealant Type | Best Substrates | Application Temp Range | Standing Water Performance | Cure Time |
|---|---|---|---|---|
| Rubberized Asphalt | Modified Bitumen, Metal, Asphalt Cap Sheet | 0°F to 120°F | Excellent (ASTM D3409 Approved) | 24 Hours (30-day solvent off-gas) |
| Tripolymer | Metal, PVC, Concrete, Asphalt Shingles | 25°F to 100°F | Good on damp surfaces | 1 to 3 Days |
| Silicone Mastic | Single-Ply, Smooth Asphalt, Metal, Existing Coatings | 32°F to 120°F | Exceptional (Handles permanent ponding) | 2 to 4 Hours |
| Elastomeric Acrylic | Metal Roof Panels, Bituminous Seams | 40°F to 100°F | Fair (Requires dry surface) | 24 Hours |
How to Patch Leak in Roof Using the 3-Course Method
Applying a simple layer of sealant over a leak often fails because building expansion and contraction will crack the unreinforced material. The standard method for a lasting patch is the 3-course application method.
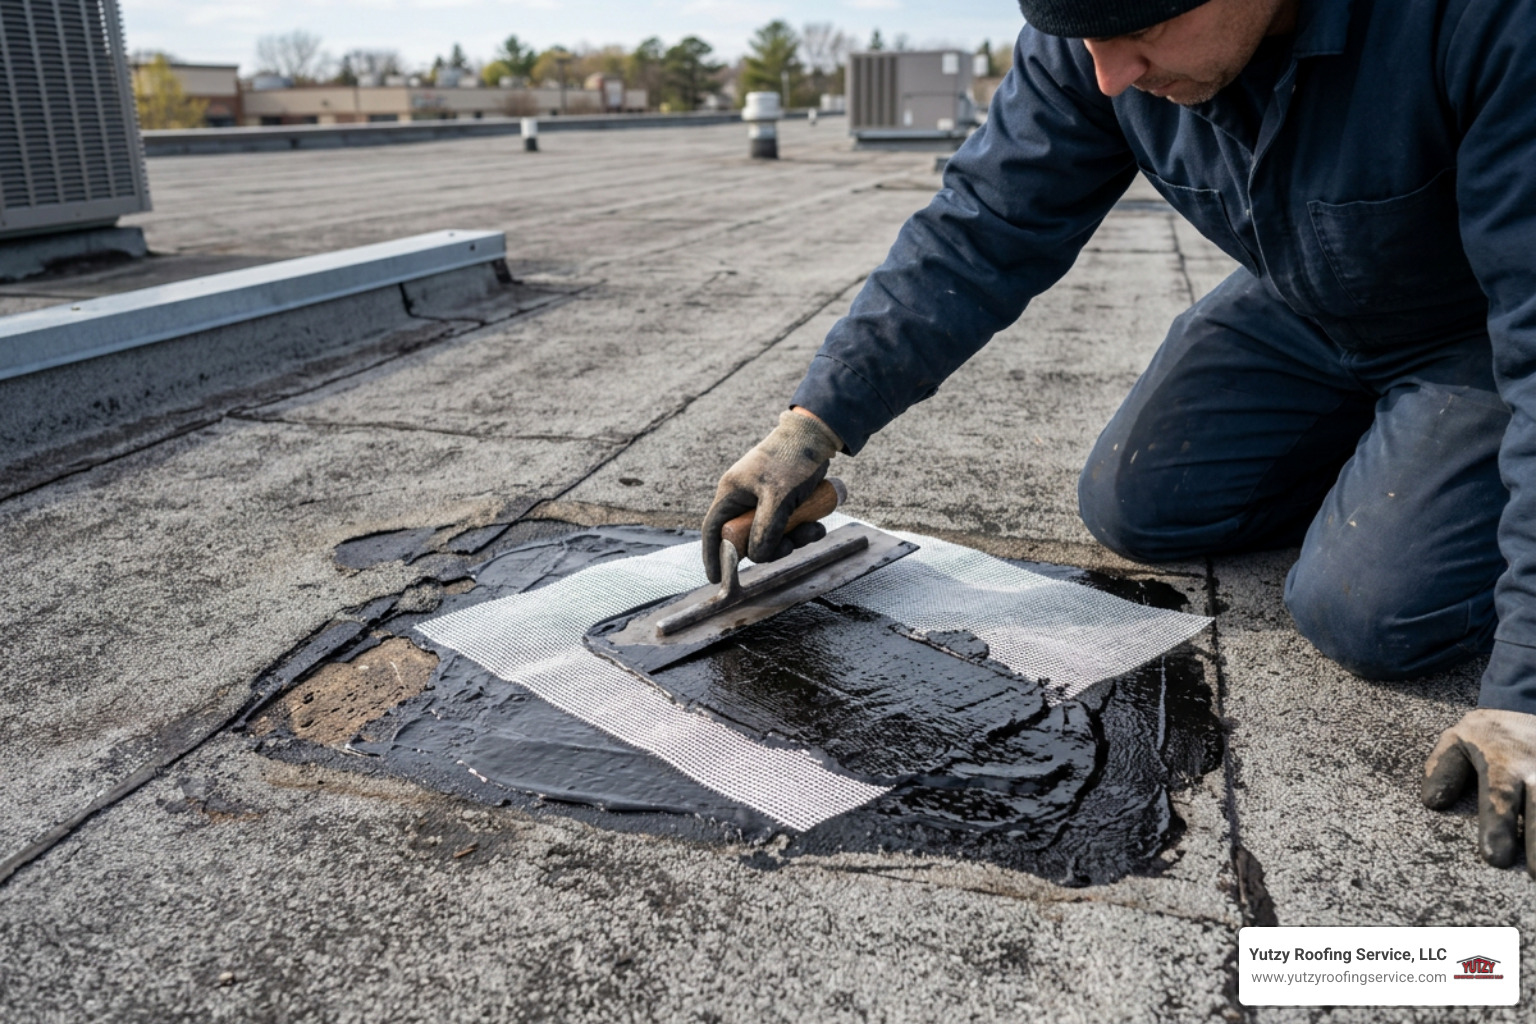
Here is how to properly apply a 3-course patch:
- Clean the surface: Use a wire brush or scraper to scrub away loose dirt, rust scale, debris, or old brittle caulk. Ensure the surface extends at least 4 to 6 inches beyond the leak source.
- Apply the first course: Trowel or spread your patching compound (such as rubberized wet patch or silicone mastic) over the damaged section at a thickness of 1/8 inch to 1/4 inch. Extend the material 2 to 4 inches past the edge of the crack or tear.
- Embed reinforcement fabric: Lay a piece of glass fabric or woven polyester mesh directly into the wet sealant. Press it down smoothly with your trowel or putty knife to eliminate air pockets and wrinkles.
- Apply the second course: Trowel a second 1/8-inch layer of patching compound directly over the reinforcement fabric, completely encapsulating it. Feather the edges outward so water drains smoothly off the patch.
- Allow proper cure time: Let solvent-based asphalt patches cure for 30 days before applying reflective topcoats.
How to Patch Leak in Roof on Rubber and Flat Surfaces
Flat single-ply membrane systems (like EPDM rubber or TPO) require different handling than asphalt or metal roofs. Using petroleum- or solvent-based asphalt cements on EPDM or PVC can dissolve the rubber membrane and destroy the roof deck.
To patch a leak in a rubber roof:
- Clean the repair area thoroughly using a dedicated membrane cleaner or un-tackifying solvent to clear dirt and oxidation.
- Use a dedicated EPDM or TPO primer to prepare the rubber membrane surface.
- Apply a self-adhesive membrane patch or peel-and-stick target patch cut to extend at least 3 inches beyond the damage in all directions. Round the corners of your patch with scissors to prevent them from catching wind and peeling back.
- Roll the patch firmly with a hand roller working from the center outward to ensure a solid bond.
- Apply a bead of lap sealant along all exposed edges of the newly applied membrane patch.
For step-by-step instructions on rubber roof maintenance, read our dedicated walkthrough on How To Repair Rubber Roofing In 6 Easy Steps.
When Temporary Patches Fail: Risks and Professional Solutions
While an emergency patch stops water during a storm, relying on temporary fixes long-term creates major hidden structural risks.
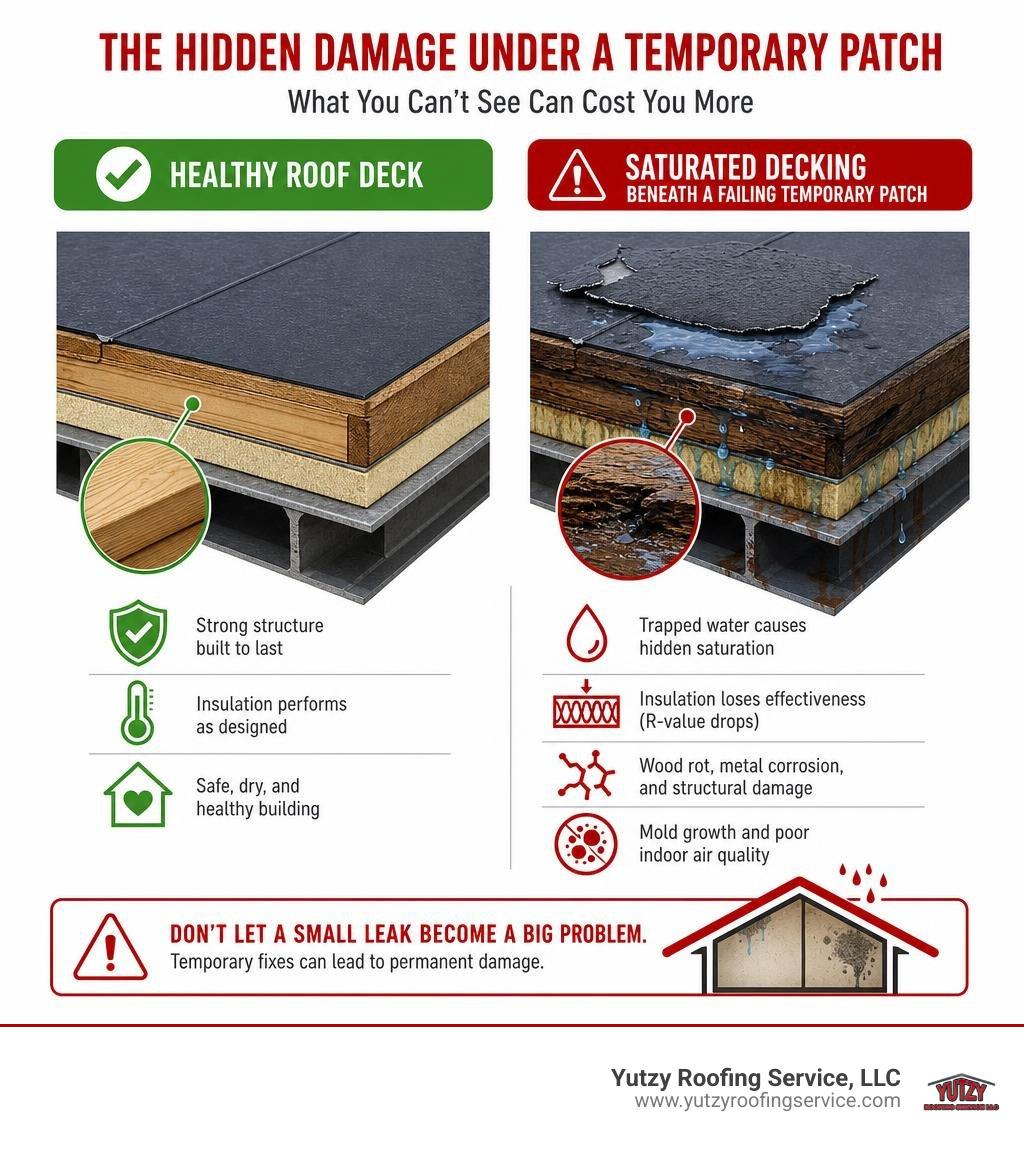
Water trapped underneath a quick repair can saturate internal insulation, dropping its R-value to zero and driving up heating and cooling costs. Prolonged moisture exposure rots wooden roof sheathing, corrodes steel decks, and encourages toxic mold growth behind interior walls.
You should contact a professional commercial roofing contractor if you notice any of these signs:
- Water ponding in patched areas for longer than 48 hours after rain.
- Recurring leaks in the exact same spot despite multiple DIY patches.
- Blistering, splitting, or widespread seam separation on flat membrane systems.
- Soft, spongy roof decking underfoot, which indicates rotting substrate underneath.
- Leaks surrounding complex penetrations, such as commercial HVAC curbs or large roof drains.
When DIY patching is no longer enough, commercial roof restoration or professional repairs deliver a permanent fix. At Yutzy Roofing Service, LLC, we specialize in high-performance liquid-applied coatings and metal restoration systems. Our non-prorated renewable warranties last up to 18 years, giving commercial building owners complete long-term peace of mind without the expense of a full roof teardown.
To learn more about selecting the right team for the job, consult our guide on How To Find Reliable Roof Leak Repair Services.
Frequently Asked Questions About Roof Patching
Can you patch a roof leak from the inside?
You can temporarily slow or divert a roof leak from the inside using roof repair tape, polyurethane sealants, or water-diversion tarps in the ceiling space. However, interior fixes only address the symptom, not the cause. Water will continue to sit on top of your roof deck, where it can rot structural sheathing. Permanent repairs must always be made on the exterior surface.
Can you patch a roof leak during heavy rain?
Yes, provided you use materials designed for wet application. Rubberized asphalt patching compounds meeting ASTM D3409 standards (such as wet patch mastic) bond directly to wet, damp, or submerged surfaces in active rain. Alternatively, securing a heavy-duty waterproof tarp over the exterior roof section is a safe way to hold off water until conditions dry out.
How long does a temporary roof patch last?
A well-applied emergency patch using the 3-course method (sealant-mesh-sealant) typically lasts anywhere from a few weeks to several months depending on weather conditions. Solvent-based asphalt sealants require roughly 30 days to fully cure and release VOCs before you can apply permanent reflective coatings over them. Treat all patches as temporary holdovers until a permanent professional repair can be completed.
Conclusion
Finding and patching a leak quickly protects your building from costly structural damage, ruined inventory, and expensive downtime. By acting fast during a leak event—containing interior water, locating the true entry point, and applying a proper 3-course patch—you buy valuable time for your commercial property.
Prevent future leaks before they start by keeping gutters clear of debris, trimming back overhanging tree branches, and scheduling routine bi-annual roof inspections.
When your roof requires more than a temporary quick fix, Yutzy Roofing Service, LLC is here to help. Serving commercial property owners across Wisconsin, Minnesota, Missouri, and Kansas, our expert restoration and membrane repair services ensure your roof stays watertight for decades to come.
Explore our comprehensive guide on Staying Dry How To Fix A Roof Leak And Mistakes To Avoid or contact our team today to schedule a professional commercial roof evaluation!
