
Why a Small Drip on Your Commercial Roof Is Never Just a Small Drip
Checking your roof for leaks early is the single most important thing you can do to protect your commercial property — especially in Wisconsin, where brutal freeze-thaw cycles and heavy snowfall punish roofing systems year after year.
Here is what you need to know right away:
How to check a commercial roof for leaks — quick overview:
- Look inside first — scan ceilings and interior walls for brown or yellow stains, peeling paint, or musty odors
- Inspect the attic or plenum space — trace any dark stains or wet spots uphill toward the roof peak; the entry point is almost always 3–10 feet uphill from where water appears
- Check the most common failure points — flashing around HVAC curbs, pipe boots, drains, skylights, and roof-to-wall intersections account for roughly 90% of commercial roof leaks
- Rule out false leaks — HVAC condensate lines and poorly vented exhaust fans can mimic roof leaks
- Perform a garden hose test — soak small sections from the lowest point upward, 5 minutes per section, with a second person watching inside
- Call a professional if the leak is intermittent, the roof is flat, or previous repairs have failed
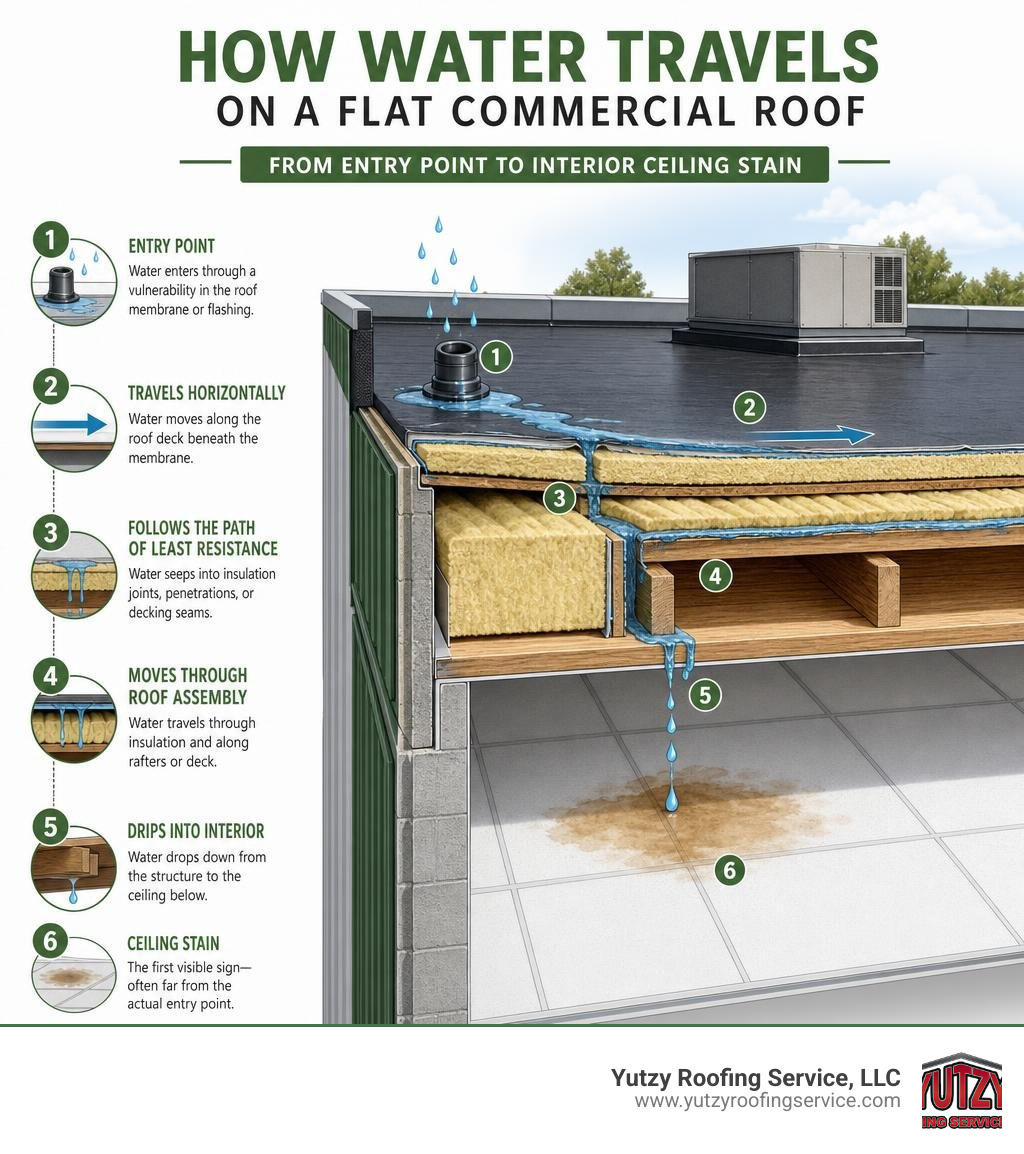
Water almost never drips straight down. It travels — sometimes 10 to 20 feet along rafters, decking, and insulation — before it ever shows up on your ceiling. By the time you see a stain, the damage underneath is already done.
And it moves fast. Mold can begin growing within 24 to 48 hours of insulation or drywall becoming saturated. A $300 repair ignored for six months can easily become a $3,000 to $5,000 structural problem.
I’m Josh Yutzy, co-owner of Yutzy Roofing Service, LLC, a family roofing business serving Wisconsin since 1995, and checking roofs for leaks — from flat commercial membranes to low-slope systems — is something our crews do every single week across the state. In the sections below, I’ll walk you through exactly how to find the source of a leak before it finds your budget.
Terms related to checking roof for leaks:
Why checking roof for leaks Early Saves Commercial Properties
In the commercial real estate world, ignorance is definitely not bliss—it is incredibly expensive. Ignoring a ceiling stain or delaying your regular facility maintenance schedule is a fast track to structural rot, ruined inventory, and compromised building safety.
When water penetrates a commercial roof membrane, it does not just sit there. It saturates the underlying insulation, which immediately destroys its R-value (thermal resistance). This means your heating and cooling systems have to work twice as hard, driving up your energy bills. Even worse, trapped moisture degrades the wood or steel roof decking underneath, leading to structural rot that can threaten the integrity of the entire facility.
Then there is the health hazard. According to the U.S. Environmental Protection Agency (EPA), mold can establish itself within a tight 24 to 48-hour window once drywall, ceiling tiles, or insulation become saturated. Mold remediation in a commercial office or warehouse in Appleton or Madison can quickly escalate into a massive financial headache, not to mention the potential liability regarding employee health and indoor air quality.
To protect your business, you must stop the flow before it floods your home or commercial facility. Catching a leak when it is a minor drip means you are looking at a simple, localized repair rather than an emergency roof replacement. Regular inspections keep minor issues minor, protecting your bottom line and ensuring your building remains safe and dry.
Common Failure Points and Causes of Commercial Roof Leaks
To successfully master checking roof for leaks, you have to know where to look. Water will always take the path of least resistance, and on a commercial roof, that path is rarely in the wide-open field of the membrane. In fact, roughly 90% of roof leaks originate at flashings and penetrations, not in the open field of shingles or flat membranes.
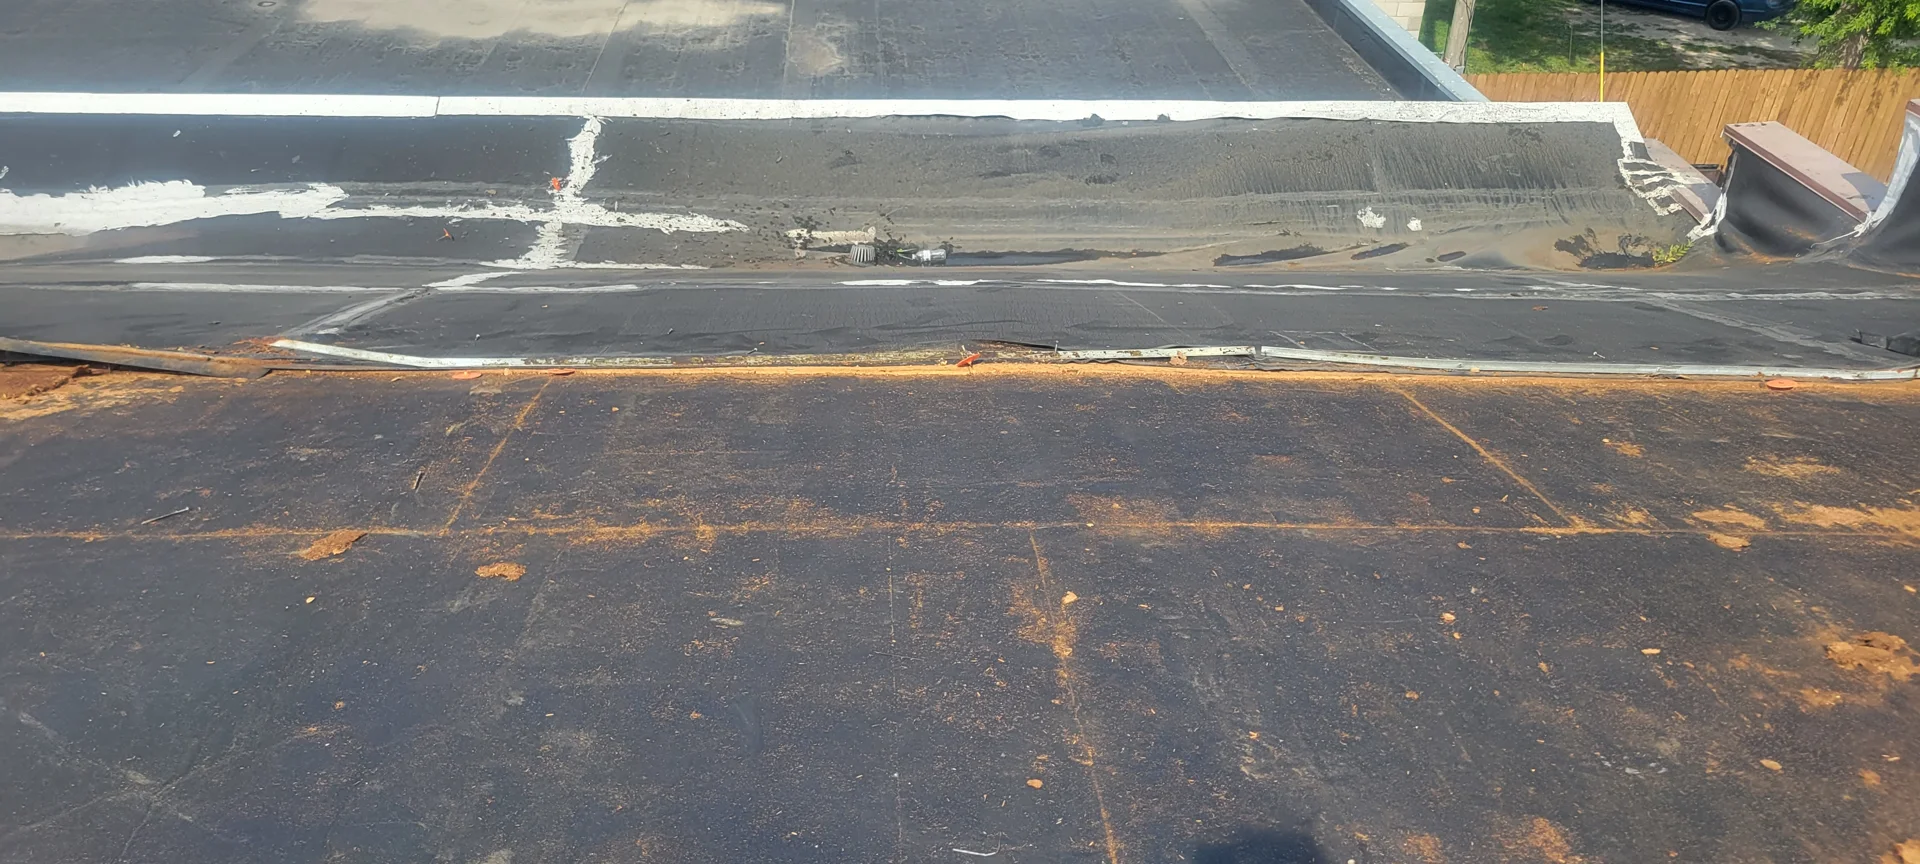
Here are the most common commercial roof failure points we encounter:
- Flashing Failures: Flashing is the metal or membrane transition material used to seal edges, corners, and areas where the roof meets a wall or chimney. Roughly 65% of roof leaks originate at flashing.
- HVAC Curbs: Commercial roofs are often home to heavy heating and cooling units. The curbs that support these units are notorious leak points. Over time, the vibration of the HVAC unit combined with thermal expansion can crack the surrounding sealant or flashing.
- Pipe Boots: These are the rubber collars that seal the pipes venting your plumbing and exhaust systems. Pipe boots are the single most common failure point on asphalt-style and low-slope roofs after 8 to 15 years. Under constant UV exposure, the rubber cracks, splits, and pulls away from the pipe.
- Roof Drains and Scuppers: When commercial roof drains become clogged with leaves, twigs, or debris, water backs up. This ponding water puts immense hydrostatic pressure on the surrounding seams, eventually forcing its way through the membrane.
- Freeze-Thaw Cycles: Our local climate is particularly brutal on roof penetrations. The Great Lakes region averages roughly 42 freeze-thaw cycles per year. As water gets into tiny cracks, freezes, expands, and melts, it rapidly accelerates flashing failure, splitting seams apart.
Distinguishing Roof Leaks from Condensation or Plumbing Issues
Before you launch a full-scale roof repair project, you must verify that the water is actually coming from the sky. “False leaks” are incredibly common in commercial buildings and often lead to misdirected repairs. In fact, condensation accounts for 30% of false positives in non-specialist flat roof leak investigations.
To rule out non-roof issues, check the following:
- HVAC Condensate Lines: If your commercial AC units are running hard during a humid Wisconsin summer, a clogged condensate drain line will spill gallons of water directly into your ceiling plenum, perfectly mimicking a roof leak.
- Plumbing Leaks: High-pressure water lines or waste pipes running through the ceiling plenum can pinhole-leak. If the drip is constant—regardless of whether it has rained recently—you are likely dealing with a plumbing issue.
- Attic and Plenum Condensation: Poor ventilation in commercial spaces can cause warm, humid air to rise and hit the cold underside of the roof deck during winter. This moisture condenses, pools, and drips down, causing water stains. For a deeper dive into diagnosing these tricky situations, consult a comprehensive roof leaks diagnosis & repair guide.
Step-by-Step Guide: How to Find a Roof Leak
Tracking down a leak requires a systematic approach. Before you head up, make sure you have the right tools.
Essential Leak Detection Tool Checklist:
- A high-powered LED flashlight or headlamp
- A pin or pinless moisture meter to map wet areas
- A thermal imaging (infrared) camera (highly effective for flat roofs)
- Chalk or a paint marker to mark dry boundaries
- A pair of high-powered binoculars (for safe ground-level visual inspections)
checking roof for leaks from the Inside
The interior search is your starting point. You want to trace the water from where it is visible back to where it enters. The critical rule: water travels. The water entry point on your roof is almost always 3 to 10 feet uphill from where stains appear on ceilings. In larger commercial structures, water can easily travel 10 to 20 feet horizontally along rafters, steel beams, or concrete decks before dripping down.
To trace a leak from the inside:
- Locate the ceiling stain: Note the center of the damp spot or stain.
- Access the plenum or attic space: Push up your ceiling tiles safely. Wear a dust mask, safety glasses, and gloves.
- Trace the framing: Use your flashlight to inspect the metal trusses or wooden rafters. Look for dark water stains, rusted nail shanks, or damp, compressed insulation.
- Follow the moisture uphill: Shine your light up the slope of the decking. Trace the damp trail up to its highest point where the wood or metal transitions back to its normal, dry color. This is your true entry point.
If you want to keep your sanity during this process, read our practical guide on finding your roof leak without losing your mind.
checking roof for leaks with No Attic Access
Many modern commercial properties feature flat roofs, vaulted ceilings, or finished drywall ceilings with absolutely no plenum or crawlspace access. In these cases, finding the leak requires some clever measuring and advanced tools.
First, locate the wet spot on your interior ceiling. Measure its distance from two fixed, permanent reference points—such as an exterior wall and a nearby structural column or window. Once you have these measurements, take them up to the roof surface. Re-measure those exact distances on the exterior membrane to isolate your target inspection zone.
On flat roofs, water can travel sideways under the membrane for up to 20 feet before finding a seam or gap in the roof deck to drip through. Because of this, visual inspection alone might not cut it. This is where thermal imaging cameras earn their keep. Wet insulation under a flat roof membrane retains heat longer than dry insulation. By scanning the roof with an infrared camera at dusk as the roof cools, the wet areas will glow brightly on your screen, pinpointing the exact boundary of the leak. For more details on this process, see this step-by-step detection guide 2026.
Performing the Garden Hose Test on Flat and Low-Slope Roofs
If a visual inspection doesn’t reveal the culprit, the garden hose test is the most reliable DIY detection method available. However, you must perform it systematically to avoid false positives.
How to perform the garden hose test:
- Make it a two-person job: One person stands on the roof with the hose, while the second person stays inside the building with a flashlight, watching the ceiling or plenum space. Keep your phones connected on a call.
- Start low and work upward: Never start spraying at the top of the roof; water will run down and mask the true source. Start at the lowest point of your target zone, such as a drain, scupper, or low-edge flashing.
- Isolate and soak: Gently run water over a small, isolated 2-foot section. Do not use a pressure washer, as high pressure can force water under secure seals and create artificial leaks.
- Be patient: Spray each section for at least 5 minutes before moving uphill to the next area. It takes time for water to saturate the insulation and drip through.
- Mark your findings: Once the inside observer spots a drip, stop spraying immediately. Mark that exterior section with chalk so you know exactly where the membrane is breached.
Temporary Fixes and When to Call a Professional
Once you have located the leak, you need to mitigate the damage. If you are waiting for a professional roofing crew to arrive, there are a few temporary fixes you can apply.
- Emergency Tarping: If you have a sloped section, secure a heavy-duty, UV-resistant tarp over the area, extending it over the ridge or uphill from the leak, securing it with weighted sandbags or 2×4 boards.
- Roofing Tape and Sealant: For minor membrane punctures or split flashing, heavy-duty self-adhering roofing tape or a professional-grade wet-patch elastomeric sealant can temporarily stop the water. Note: Avoid using standard household silicone caulk on commercial roof membranes; it will not adhere properly and degrades quickly under UV rays.
- Interior Damage Control: If water is pooling above a drywall ceiling, use a small screwdriver to puncture a small hole in the center of the sag. This drains the trapped water safely into a bucket, preventing a sudden, spontaneous ceiling collapse.
While these temporary measures can buy you time, they are not permanent solutions. In fact, incorrect diagnosis leads to 45% of flat roof repairs being misdirected, often wasting money on temporary patches that miss the root cause. It is crucial to understand the 6 ways to fix your leaking roof and recognize when a professional is required.
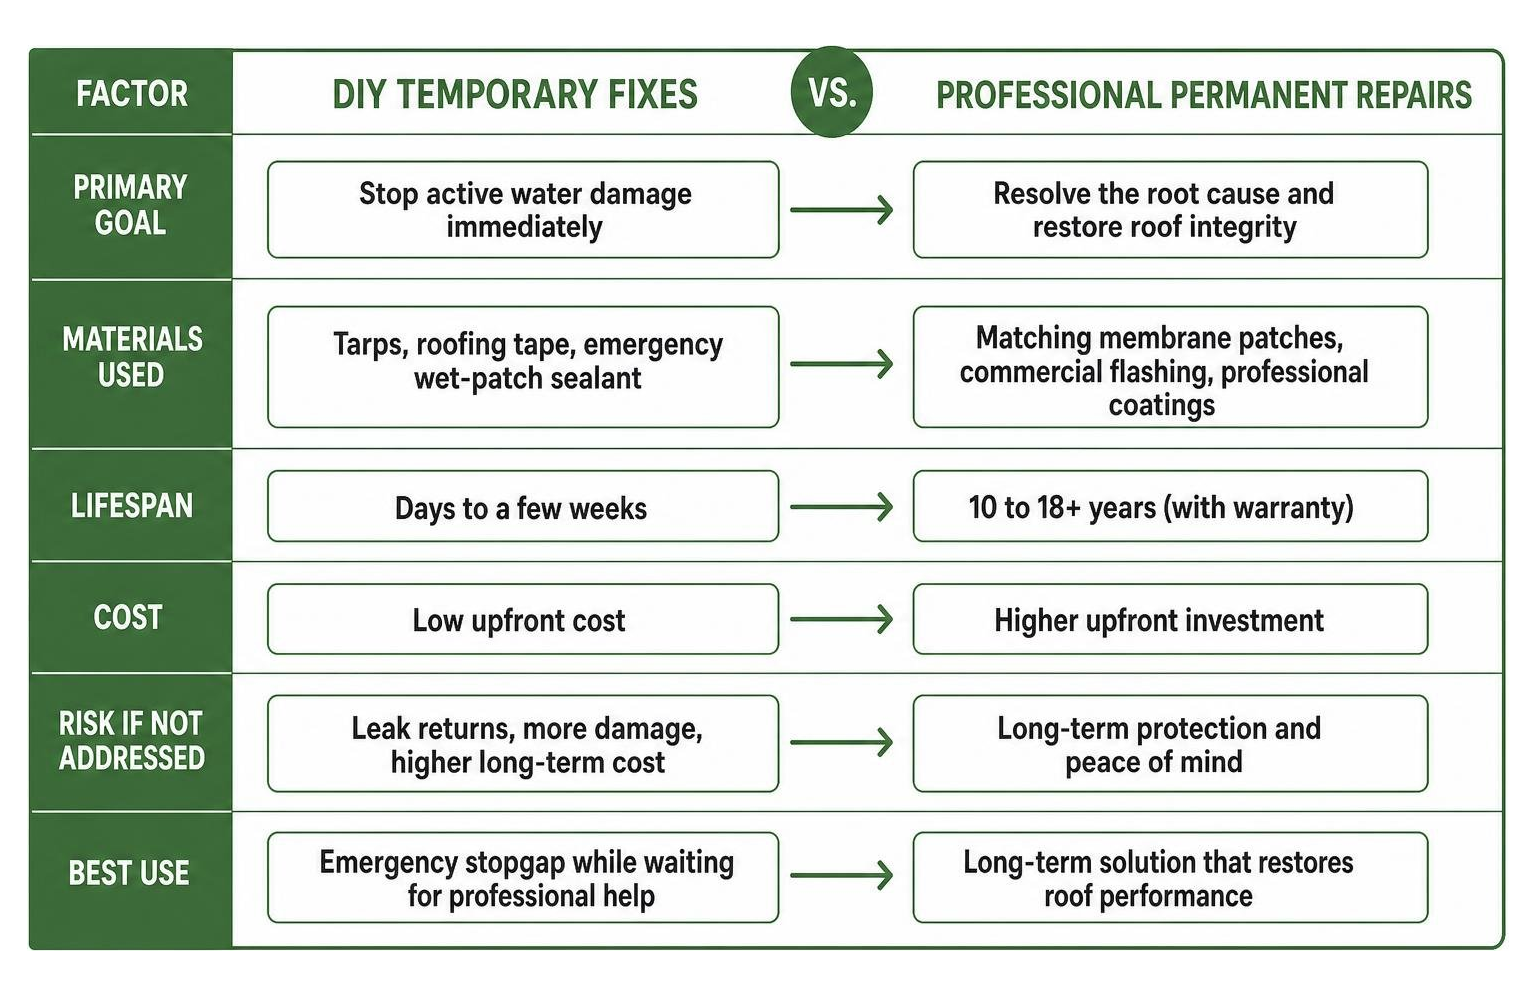
| Factor | DIY Temporary Fixes | Professional Permanent Repairs |
|---|---|---|
| Primary Goal | Stop active water damage immediately | Resolve the root cause and restore roof integrity |
| Materials Used | Tarps, roofing tape, emergency wet-patch sealant | Matching membrane patches, commercial flashing, professional coatings |
| Lifespan | Days to a few weeks | 10 to 18+ years (with warranty) |
| Warranty Impact | Can void existing commercial roof warranties | Preserves and often extends roof system warranties |
| Safety Risk | High (climbing ladders, walking on wet roofs) | None for the building owner |
Frequently Asked Questions about Commercial Roof Leaks
Why does my commercial roof leak only during heavy rain?
During a light drizzle, water drains off the roof quickly. However, heavy downpours increase water volume and velocity. This leads to temporary ponding around drains and scuppers, putting hydrostatic pressure on seams. Furthermore, heavy storms are often accompanied by high winds, which can push wind-driven rain horizontally under coping caps, counter-flashing, or ridge vents that normal vertical rain never reaches.
How much does a professional commercial roof leak inspection cost?
A standard, independent visual roof inspection typically costs between $250 and $350. If your leak is tricky and requires advanced diagnostics, adding professional thermal imaging or an infrared drone moisture scan generally ranges from $200 to $500, depending on the size of the facility. To understand the different factors that influence these rates, check out our guide on how much does a roof inspection cost.
Can a minor roof leak resolve itself?
Absolutely not. Roof leaks never heal on their own. Even if a leak seems to “disappear” during dry spells, the physical gap in your membrane remains. Meanwhile, moisture trapped inside your decking and insulation continues to cause progressive damage, including wood rot, steel rust, and mold growth. What starts as a simple $150 pipe boot replacement can easily escalate into a multi-thousand-dollar structural restoration if left ignored.
Conclusion
Checking your roof for leaks is not a task to put off for next season. In Wisconsin and Minnesota, our buildings face some of the toughest weather conditions in the country. From the heavy snow loads in Eau Claire and Wausau to the intense freeze-thaw cycles in Madison and Green Bay, your commercial roof works hard 24/7.
Catching a leak early means a simple, affordable repair. Waiting too long can devastate your building’s structure and your operating budget.
If you suspect your building has a leak, don’t climb up a wet ladder or guess where the water is coming from. At Yutzy Roofing Service, LLC, we specialize in commercial roof restoration, spray foam coatings, metal roof restoration, and EPDM repairs. We stand behind our work with an industry-leading, up to 18-year non-prorated renewable warranty, serving commercial property owners throughout Wisconsin and Minnesota.
Ready to secure your property? Contact us today to schedule a professional inspection, or learn more about how our commercial solutions work by reading our detailed guide on flat roof leak repair: how does it work?. Let’s stop the drip before it stops your business!
