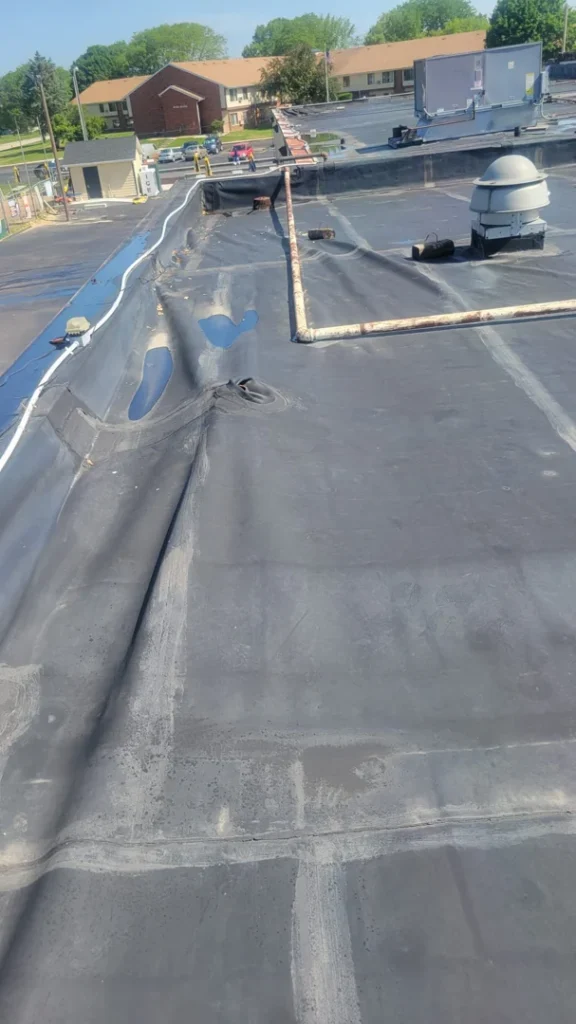
Why EPDM Seam Failures Are a Serious Threat to Your Commercial Building
EPDM seam repair is the process of resealing or patching the bonded joints in a rubber roofing membrane to stop water from getting underneath. Here’s a quick overview of what it involves:
- Clean the damaged seam area thoroughly (remove talc, dirt, and debris)
- Prime both membrane surfaces with an EPDM-compatible primer
- Apply seam tape or liquid adhesive to bond the surfaces
- Roll the repair with a silicone roller to eliminate air pockets
- Seal all exposed edges with EPDM edge sealant
Seams are the weak point of any EPDM roof. In fact, seam failure accounts for the majority of problems reported in EPDM roofing systems — and a surprising 65% of all roof replacements happen because of leaks that started small and were left unaddressed.
For commercial property owners in Wisconsin, this isn’t just a maintenance headache. A failed seam in January or during a heavy spring thaw can mean water intrusion, damaged inventory, interrupted operations, and costly repairs to your building’s interior.
The good news? Most seam failures are preventable and repairable — if you catch them early and use the right methods.
I’m Josh Yutzy, and my family’s roofing business has been repairing and restoring commercial EPDM roofs across Wisconsin since 1995. EPDM seam repair is one of the most common calls we get from commercial building owners, and in this guide I’ll walk you through exactly how to identify a failing seam, what proper repair looks like, and when it makes more sense to restore than to patch.
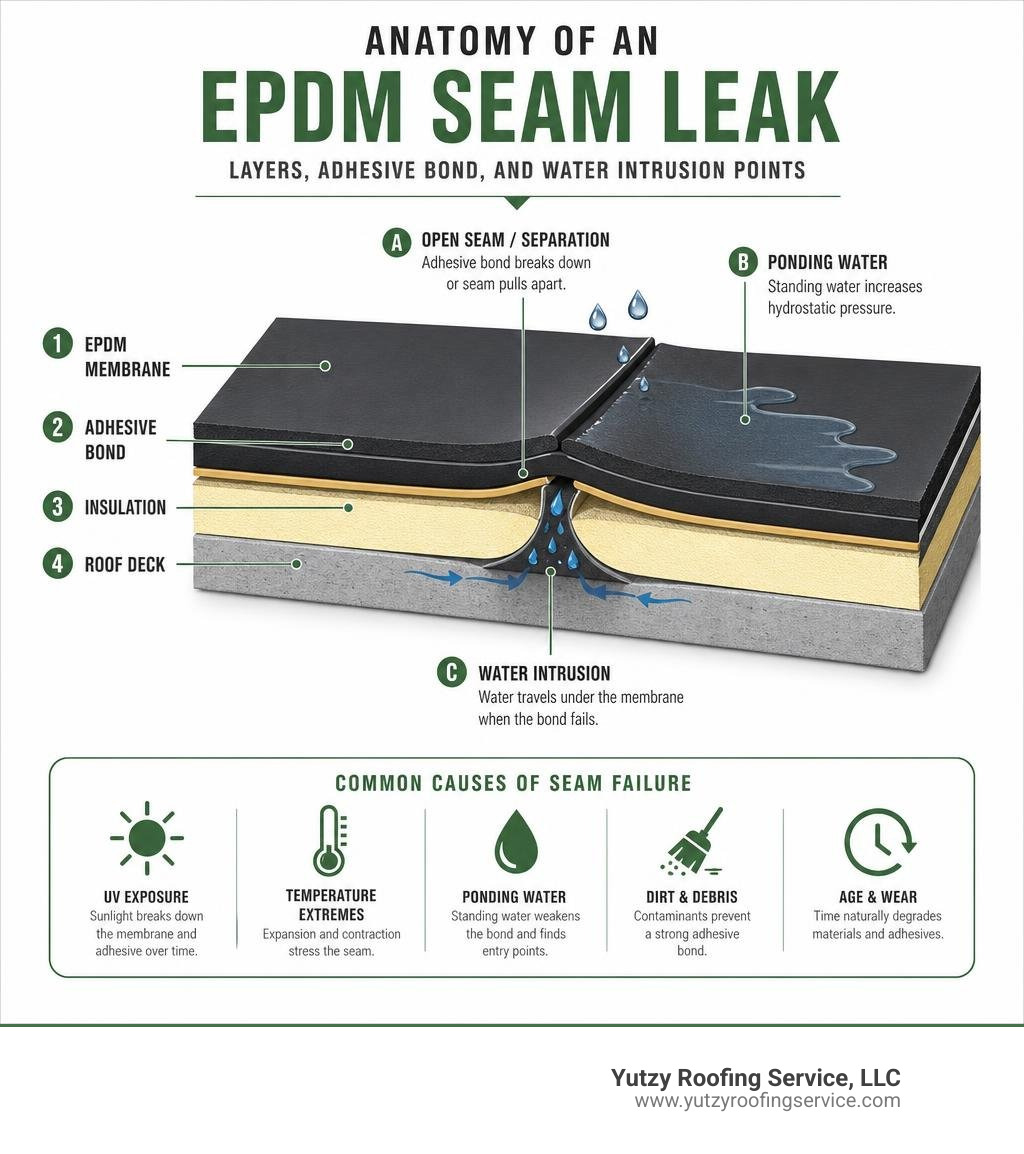
Basic EPDM seam repair vocab:
Why Commercial EPDM Seams Fail Over Time
EPDM (ethylene propylene diene monomer) rubber has been a dominant force in the commercial roofing market for over 40 years. With over 1 billion square feet installed globally, its durability in wide-ranging temperatures is legendary. However, because EPDM is a thermoset membrane, it undergoes a process called vulcanization during manufacturing.
This chemical cross-linking makes the rubber incredibly stable, but it also means the material is chemically inert. Unlike thermoplastic membranes like TPO or PVC, EPDM cannot be heat-welded or solvent-welded on your roof. To join two sheets of rubber together, we must rely entirely on adhesives or specialized pressure-sensitive tapes.
Over decades of exposure to harsh Midwestern weather, those adhesive bonds are subjected to incredible stress. When the bond breaks down, a seam separates, creating what we in the industry call an “open lap.” To understand how to fix these failures, we first have to look at why they happen in our local climate, stretching from Madison to Mankato. For a deeper dive into these issues, you can read The Ultimate Guide to EPDM Repair from Madison to Mankato.
The Role of Manufacturing Talc and Improper Cleaning
During the manufacturing of EPDM, a fine talc powder or clay dusting agent is applied to the surface of the rubber sheets. This prevents the large rolls of rubber from sticking to themselves while packaged and shipped.
While talc is great for shipping, it is the absolute enemy of adhesion. If a contractor installs a roof or performs a repair without thoroughly scrubbing away this talc residue, the adhesive or tape will bind to the loose powder rather than the actual rubber membrane. Over time, moisture and wind pull the poorly bonded seam apart.
When we perform an EPDM seam repair, we must clean the membrane well beyond the defect area. Every speck of dust, dirt, and manufacturing talc must be completely eliminated using specialized cleaners and scrub pads before we even think about opening a can of primer or unrolling seam tape. If you want to see how critical this prep work is, check out this guide on Repairing EPDM seam.
Environmental Stressors and Membrane Shrinkage
Our commercial roofs in places like Wausau, Green Bay, and Rochester, MN face some of the most extreme temperature swings in the country. We regularly see summer roof temperatures exceed 140°F, followed by winter drops well below zero.
These extreme thermal cycles cause EPDM to expand and contract. Over years of UV exposure and thermal stress, the rubber membrane can begin to shrink. As the membrane pulls inward, it places immense shear stress on the seams and flashings.
Eventually, this constant pulling forces the seams to creep, split, or pull away from perimeter walls and drip edges. This is why routine inspections are so vital; catching a seam that is beginning to pull under tension allows us to reinforce it before it tears open completely. To keep your system in top shape, read our article on How to Keep Your EPDM Roof Happy and Healthy.
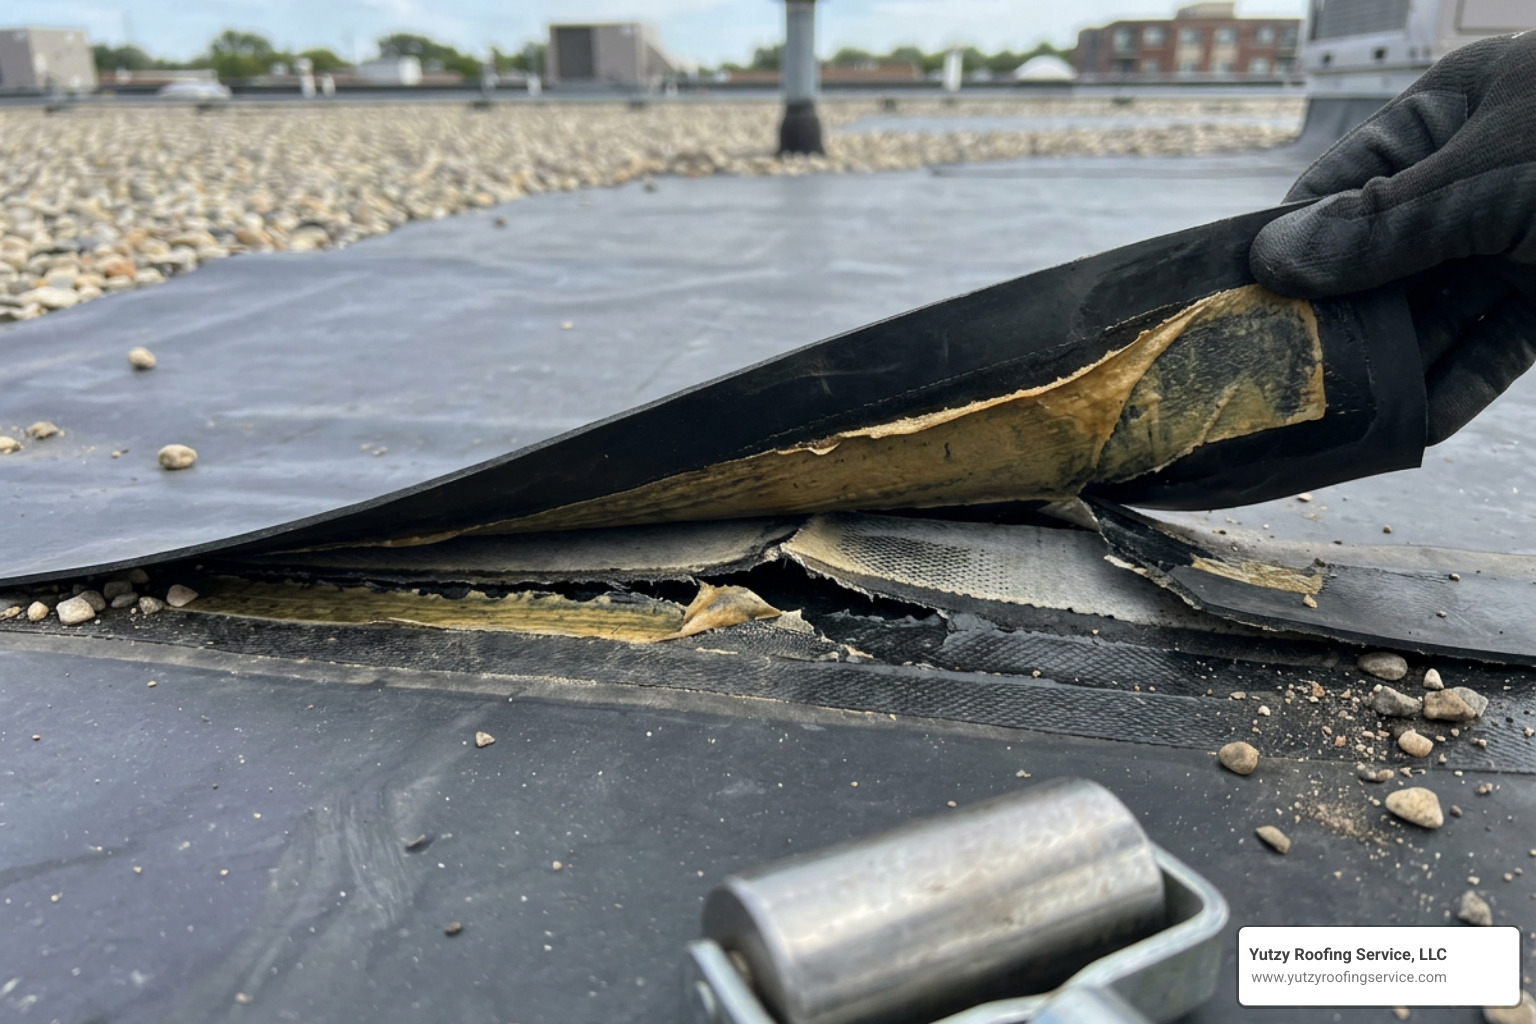
Step-by-Step Guide to Professional EPDM Seam Repair
When we tackle an EPDM seam repair, we don’t just slap some caulk over the leak and hope for the best. A professional, long-lasting repair requires a highly structured approach using commercial-grade repair kits, primers, and heavy-duty silicone rollers. For a complete look at flashing and seam fixes, see Patching Things Up: A Guide to EPDM Flashing and Seam Repair.
Preparing the Surface for EPDM Seam Repair
The success of any EPDM repair is 90% preparation and 10% application. If the surface isn’t prepared correctly, the patch will peel off within a few seasons.
- Inspect and Clear: We pull back any loose, failed seam material to find where the membrane is still soundly adhered. We remove any trapped water, wet insulation, or debris underneath.
- Deep Clean: We scrub the repair area with a specialized EPDM membrane cleaner or mild solvent solution. The cleaned area must extend at least 6 inches beyond the perimeter of the defect.
- Apply Primer: Using a coarse scrub pad, we apply a high-quality primer, such as Millennium EPDM Seam Tape – H.B. Fuller. The scrubbing action is vital because it physically breaks down any remaining talc and helps the primer penetrate the pores of the rubber.
- Observe Curing/Drying Time: We must let the primer dry completely. Depending on the humidity and temperature, this typically takes less than 20 minutes in the summer. We use the “finger-push” test—the primer must be dry to the touch and not slide or feel tacky when pressed with a clean finger.
Executing Tape-Based EPDM Seam Repair
Once the primer is dry, we proceed with installing a tape-based repair, which is the industry standard for modern, reliable EPDM restorations.
- Cut the Patch: We cut a piece of cover strip or uncured EPDM tape that extends at least 4 inches beyond the defect in all directions. Crucially, we round all the corners of the patch. Sharp, square corners are easily caught by wind, snow scrapers, or foot traffic, leading to premature peeling.
- Position and Apply: We place the patch over the primed area and slowly peel away the release liner at a 45-degree angle. This technique helps prevent air bubbles from getting trapped under the tape.
- Roll the Seam: Using a heavy 2-inch silicone roller, we roll the patch thoroughly. We start from the center of the patch and roll outward toward the edges to press out any trapped air and activate the pressure-sensitive adhesive.
- Apply Edge Sealant: To prevent moisture from migrating under the edges of the newly installed patch, we apply a continuous 1/4-inch bead of EPDM lap sealant, like Millennium EPDM Edge Sealant – H.B. Fuller, along all exposed edges.
Comparing Adhesive-Based vs. Tape-Based Repair Methods
Historically, EPDM roofs were repaired using liquid splice adhesives. Today, pressure-sensitive tapes and pre-fabricated patches have largely taken over commercial roofing. Both methods have their place, but understanding the differences is key to a durable repair. For more details on reinforcing your system, read Rubber Roofing Repair: Renewing and Reinforcing Your EPDM Roofing System.
| Feature / Consideration | Tape-Based Repairs (Seam Tape & Cover Strips) | Adhesive-Based Repairs (Liquid Splice Cement) |
|---|---|---|
| Primary Material | Vulcanized rubber tape with pressure-sensitive adhesive | Liquid butyl or neoprene-based contact adhesive |
| Curing Time | Immediate bond; builds maximum strength within 24 hours | Requires open time to flash off before mating; slow cure |
| Ease of Application | High; peel-and-stick process minimizes human error | Moderate to Low; highly dependent on wet film thickness |
| Durability & Lifespan | Outstanding; highly resistant to UV and weathering | Good, but prone to drying out and cracking over time |
| T-Joint Treatment | Requires a specialized Millennium EPDM T-Joint Patch – H.B. Fuller | Requires heavy application of lap sealant at intersections |
| VOC / Odor Levels | Zero VOCs; environmentally friendly | High VOCs; strong chemical odor during application |
Best Practices, Weather Considerations, and Common Mistakes
Performing EPDM seam repair in the Upper Midwest requires a deep understanding of our local climate. Temperature and humidity play massive roles in how adhesives and primers behave.
For instance, if you apply primer when the temperature is below 40°F, moisture from the air can condense on the cold membrane as the solvents evaporate. This is known as “primer blushing,” and it will completely destroy the adhesive bond. Always ensure the ambient and substrate temperatures are within the manufacturer’s recommended limits.
Here are the most common mistakes we see DIYers and inexperienced contractors make:
- Mating surfaces too quickly: Pressing the tape or patch down while the primer or adhesive is still wet traps solvents underneath, causing the rubber to swell and bubble.
- Skipping the roller: Simply smoothing the patch with your hands does not apply enough pressure to activate the pressure-sensitive tape. You must use a silicone roller.
- Using incompatible sealants: Applying standard silicone, asphalt plastic cement, or polyurethane caulking to EPDM will fail. These chemicals can chemically degrade the rubber, turning it into a gummy, ruined mess. Always use dedicated EPDM lap sealants.
If your EPDM roof is showing widespread seam failures, patching them one by one can become a costly game of whack-a-mole. In these scenarios, a full fluid-applied restoration is often the most cost-effective solution. To see how restoration compares to localized repairs, check out the Top Benefits of EPDM Roof Restoration.
Frequently Asked Questions About EPDM Seam Repair
How long does an EPDM seam repair last?
A professionally executed seam repair using high-quality seam tape, proper primer, and edge sealant can easily last 10 to 15 years. However, the overall lifespan depends heavily on the condition of the surrounding membrane. If the rest of the roof is severely aged and shrinking, new stress points may develop adjacent to the repair.
Can you repair EPDM seams in cold weather?
Yes, but it requires extra care. Most standard primers and sealants should not be applied below 40°F due to the risk of primer blushing. If winter repairs are absolutely necessary to stop an active leak, we must warm the membrane and materials, use specialized cold-weather products like TRI-BUILT ® EPDM EDGE SEAL, and ensure the surface is completely free of frost, ice, and moisture.
When should I choose roof restoration over seam repair?
If your EPDM roof has only one or two isolated leaks due to physical damage or a localized installation error, a simple seam repair is your best bet. However, if the seams are failing across the entire roof, or if the membrane is chalking, shrinking, and cracking, spot repairs will not solve the underlying problem.
In this case, an EPDM restoration system is a far better investment. Applying a high-performance fluid-applied coating over the entire roof seals every seam, flashing, and penetration seamlessly, extending the life of your roof by up to 20 years at a fraction of the cost of a replacement. To learn more about this process, read EPDM Restorations: What to Know.
Conclusion
A failing seam doesn’t have to mean a ruined building or an expensive, disruptive roof tear-off. By catching seam issues early and utilizing professional repair methods, you can preserve your EPDM roof and keep your business safe from water damage.
At Yutzy Roofing Service, LLC, we specialize in helping commercial building owners across Wisconsin and Minnesota—including Madison, Appleton, Green Bay, Wausau, and Mankato—protect their investments. We don’t just patch leaks; we offer comprehensive restoration systems backed by our non-prorated, renewable warranties of up to 18 years.
If you suspect your commercial roof has failing seams, don’t wait for the next heavy downpour to find out. Protect your commercial property with a professional EPDM restoration and contact us today for a thorough, professional evaluation.
