What You Need to Know About Sealing a Rubber Roof (Quick Answer)
Sealing a rubber roof the right way can be the difference between a dry building and a costly disaster — especially in Wisconsin, where winters are brutal and summers bring intense UV exposure.
Here is a quick overview of how to seal a rubber roof:
- Identify your membrane — EPDM feels like a rubber inner tube; TPO feels plastic-like.
- Clean thoroughly — Remove all dirt, debris, and loose material. This is the most critical step.
- Reinforce seams and penetrations — Use seam tape or geo-textile with sealant caulk before coating.
- Apply the right primer — EPDM and TPO require specific primers for proper adhesion.
- Apply your coating — Use a liquid rubber or silicone coating in 2-4 coats, waiting 6-8 hours between each.
- Cure and inspect — Allow 48-72 hours to cure. Inspect 1-2 times per year after that.
A small roof leak rarely stays small. What starts as a minor drip at a seam or vent can quietly compromise insulation, damage inventory, and lead to structural problems — all before you even notice water inside. For commercial property owners, that kind of damage adds up fast.
The good news? In many cases, a properly sealed rubber roof can add years of life to an existing membrane — without the cost of a full tear-off and replacement.
I’m Josh Yutzy of Yutzy Roofing Service, LLC, and our family business has been working on commercial roofing systems across Wisconsin since 1995, including sealing rubber roof membranes on everything from small flat-roof additions to large commercial buildings. In the sections below, I’ll walk you through exactly what we’ve learned about doing this job right.
Sealing rubber roof terms made easy:
The Ultimate Guide to Sealing Rubber Roof Systems

When we talk about flat or low-slope commercial roofs, rubber membranes are the undisputed kings of the hill. They are durable, flexible, and relatively easy to maintain. However, even the toughest rubber membranes have a lifespan. In Wisconsin and Minnesota, our roofs have to survive wild temperature swings—from sizzling 90°F summer days in Madison to bone-chilling -20°F winters in Mankato.
Over time, these extreme shifts take a toll on any commercial roof. Knowing how to maintain and seal your membrane is the best way to protect your building and keep your hard-earned money in your pocket.
Why Sealing Rubber Roof Membranes is Essential
Why do we need to seal these roofs in the first place? The short answer is that the elements are constantly fighting against your roof.
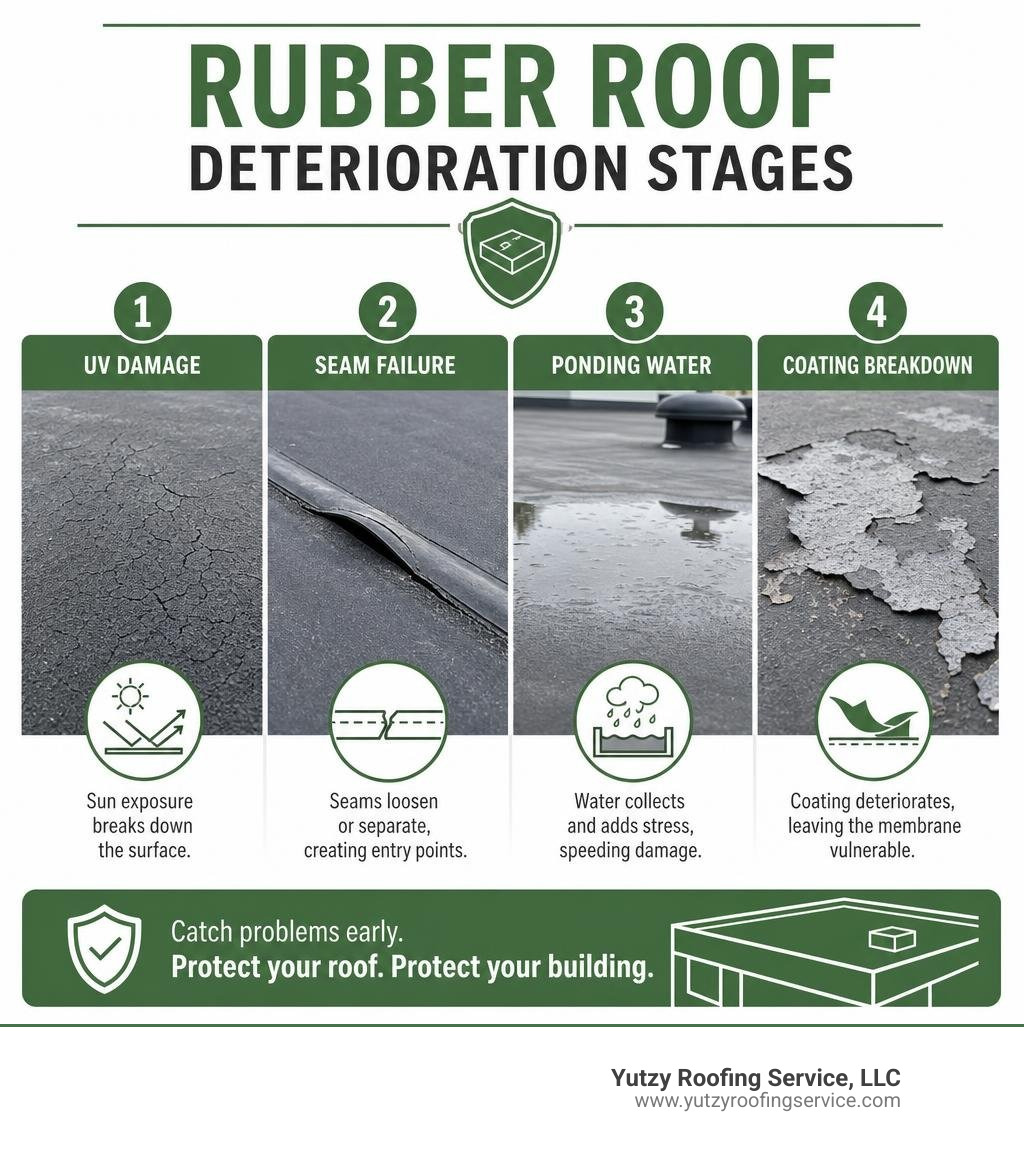
First, there is UV degradation. The sun’s ultraviolet rays act like slow-motion sandpaper on your roof. Over years of exposure, EPDM (Ethylene Propylene Diene Monomer) rubber begins to oxidize, breaking down the top white or black layer and leaving behind a thin, carbon-black residue. This is why aging EPDM roofs often look chalky or display dark spots.
Second, we have thermal shock. In places like Wausau and Eau Claire, a roof can go from freezing overnight to baking hot under the afternoon sun. This rapid temperature change causes the membrane to expand and contract. Over time, this constant movement stresses the seams, flashings, and transitions, eventually pulling them apart.
Finally, there is the issue of ponding water. Flat roofs are notorious for holding water, especially around clogged drains or low spots. When water sits on a roof for more than 48 hours, it puts immense hydrostatic pressure on the seams. If those seams have been weakened by UV rays and thermal shock, water will find a way in. By applying a high-quality liquid rubber or silicone coating, you create a seamless, monolithic barrier that resists ponding water and reflects harmful UV rays.
To keep your system in top shape, check out our comprehensive resource on How to Maintain a Rubber Roof Membrane A Guide.
Identifying EPDM vs TPO and Other Membranes
Before you open a single can of sealant, you must identify exactly what kind of rubber roof you have. Applying the wrong product to the wrong membrane is a fast track to a peeling, bubbling mess.
Here is how you can tell them apart:
- EPDM (Ethylene Propylene Diene Monomer): This is the classic “rubber roof.” It is typically black (though white versions exist) and has a distinct texture. If you touch it, it feels exactly like a giant bicycle or truck inner tube. It is highly flexible and stretchable.
- TPO (Thermoplastic Polyolefin): TPO is usually bright white, light gray, or tan. Unlike EPDM, it feels much more like a stiff, textured plastic sheet than soft rubber. It is hot-air welded at the seams rather than glued.
- Modified Bitumen: Often confused with rubber because of its dark color, modified bitumen feels rough and asphalt-like, often covered in tiny mineral granules similar to standard roof shingles.
If you are dealing with commercial low-slope roofing in Green Bay or Appleton, identifying these materials accurately is crucial because EPDM and TPO require completely different chemical primers to bond successfully with a new coating.
Step-by-Step Preparation and Cleaning Guide
If you take only one piece of advice from this guide, let it be this: Your roof coating is only as good as your surface preparation.
We often tell our clients that 80% of the work in a successful roof restoration happens before we even open a paint roller. If you try to apply a premium liquid rubber coating over a dusty, oily, or damp surface, it will peel off like sunburned skin within a year.
To ensure you don’t miss a beat, you can follow our detailed guide on How to Repair Rubber Roofing in 6 Easy Steps.
Deep Cleaning and Membrane Prep
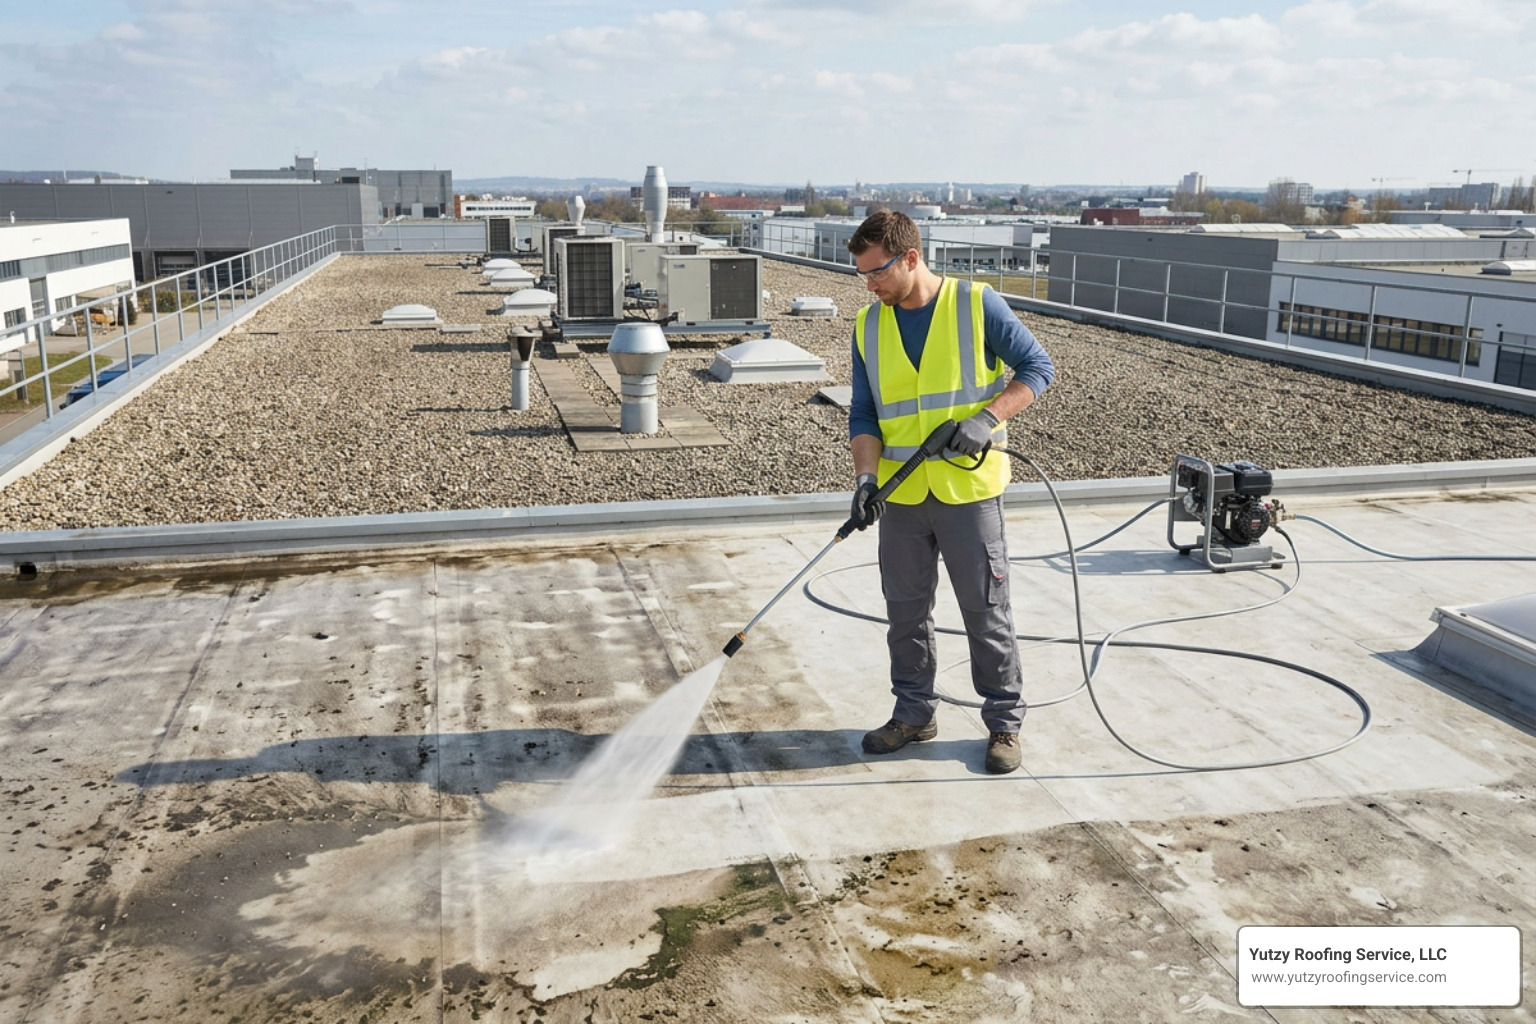
Cleaning a commercial rubber roof requires more than a quick sweep with a broom. Here is the step-by-step cleaning process we recommend:
- Clear the Debris: Sweep away all loose dirt, leaves, branches, and old patch materials.
- Pressure Wash: Use a pressure washer to blast away stubborn grime, mold, and chalky residue. Be careful not to use excessive pressure (keep it under 2,000 PSI) and avoid spraying directly into seams or flashings, which can force water under the membrane.
- Use a Dedicated Cleaner: Wash the roof with a specialized roof cleaner or a mixture of water and a mild, residue-free detergent like Dawn. Avoid oil-based cleaners or harsh solvents, as they can permanently damage EPDM. Scrub stubborn areas with a medium-bristle brush.
- Rinse Thoroughly: Flush the entire roof with clean water. Make sure to rinse the sides of the building as well to prevent dirty water from leaving unsightly streaks on your exterior walls.
- The Acetone Wipe (For EPDM): For older EPDM roofs, wiping the membrane with acetone immediately before priming can help soften the rubber slightly, opening up its pores to create an incredibly strong chemical bond with the primer.
- Let It Dry: This is non-negotiable. The roof must be 100% dry before you apply any coatings. Trapped moisture is the number one cause of bubbling and adhesion failure. We recommend letting the roof dry for at least 24 to 48 hours.
Reinforcing Seams, Joints, and Penetrations
Once the roof is clean and dry, it’s time to address the weak points. Flat roofs don’t usually leak in the middle of a solid sheet of rubber; they leak at the seams, around pipe penetrations, skylights, and HVAC units.
Before coating the entire roof, you must reinforce these high-risk areas using what we call the three-course method:
- Apply a thick layer of liquid rubber sealant or adhesive caulk over the seam or joint.
- Embed a heavy-duty polyester geo-textile fabric or seam tape directly into the wet sealant, smoothing out any wrinkles or air bubbles.
- Apply a second thick layer of sealant over the fabric, completely encapsulating it.
This creates a reinforced, flexible bridge that can handle the intense expansion and contraction of the roof without cracking. For a breakdown of how to handle these smaller repairs yourself, read through our guide on DIY Rubber Roof Repair Made Easy.
Best Coatings and Primers for Sealing Rubber Roof Surfaces
Choosing the right products for sealing rubber roof systems can feel overwhelming. There are dozens of options on the market, from cheap retail coatings to professional-grade chemical systems. Let’s break down the most effective options so you can make an informed choice. For a deep dive into specific products, read our review of the Top Products to Fix Your Leaky Rubber Roof.
Choosing the Right Sealant vs Coating
First, let’s clarify the difference between a sealant and a coating. A sealant is a thick, heavy-duty material used to fill gaps, patch holes, and reinforce seams (like a specialized caulk or heavy trowel-grade cement). A coating is a thinner, liquid membrane designed to be rolled or sprayed over the entire surface of the roof to provide comprehensive waterproof and UV protection.
- Liquid Butyl Rubber: This is an outstanding option for EPDM restoration. It is highly flexible, durable, and often boasts excellent reviews (such as a 4.8 out of 5-star rating from hundreds of users). Many high-quality butyl products don’t require a separate primer and can be applied in a single, thick coat.
- Silicone Coatings: Silicone is the gold standard for roofs that suffer from ponding water. Unlike acrylic coatings, which can soften and re-emulsify under standing water, 100% silicone coatings (like Gardner Flat Roof Coat-n-Seal) withstand permanent ponding water. They also offer incredible UV reflection, keeping your building cooler.
- Acrylic Coatings: These are water-based, low-VOC, and very easy to apply. However, they are not suitable for roofs with poor drainage or frequent ponding water.
For a head-to-head comparison of these two approaches, check out our guide on Rubber Roof Sealant vs Coating Which One Wins. If you are looking for a highly flexible, multi-purpose option, you might also consider professional-grade waterproof sealant membranes that can be applied to flat roofs, foundations, and gutters alike.
Primers and Accessories for EPDM and TPO
If you are coating an EPDM or TPO roof, skipping the primer is a recipe for disaster.
EPDM is a non-porous material that naturally resists adhesion. To get a coating to stick, you must first apply an EPDM-specific primer. This primer acts as a chemical bonding agent, essentially “melting” into the rubber surface on a microscopic level to create a tacky, receptive surface that the topcoat can grip.
TPO roofs are similarly slick and require a dedicated TPO primer or adhesion promoter. While some high-solids silicone coatings claim to be “self-priming,” we always recommend using a primer on TPO to guarantee long-term performance.
How to Apply a Liquid Rubber Coating Properly
Now that your roof is clean, your seams are reinforced, and your primer is dry, you are ready for the main event: applying the liquid rubber coating.
Ideal Weather Conditions and Cure Times
Mother Nature has a massive say in the success of your roofing project. If you apply a liquid rubber coating under the wrong conditions, it won’t cure properly, leading to peeling, cracking, or wash-offs.
Here are the ideal conditions for application:
- Temperature: Apply when ambient and surface temperatures are between 50°F and 86°F. Some specialized moisture-cure products can be applied in cooler weather, but standard liquid rubber requires warm temperatures to cure.
- Humidity: Keep humidity below 80%. High humidity slows down evaporation and extends cure times significantly.
- Dew Point: The roof temperature must be at least 5 degrees above the dew point to prevent microscopic moisture from forming on the membrane as you coat.
- Rain Window: Ensure there is no rain in the forecast for at least 24 to 48 hours. While some silicone coatings are rain-safe in as little as 15 minutes, standard water-based liquid rubber needs a solid dry window to cure. Always consult the manufacturer’s specific guidelines, such as the Black Jack Rubr-Seal specifications, to ensure compliance with temperature and drying requirements.
Application Techniques, Tools, and Coverage Rates
To apply the coating, you will need a heavy-duty 3/4-inch nap paint roller, a high-quality paintbrush for cutting in around edges and penetrations, and a power drill with a mixing paddle to stir the coating thoroughly before use.
When applying the coating, work in manageable sections. Always maintain a “wet edge” to prevent visible seams between sections. We highly recommend applying two thin coats rather than one thick coat. Thin coats cure much more evenly and minimize the risk of trapping solvents or moisture inside the membrane.
| Product Type | Coverage Rate (per gallon) | Recommended Coats | Dry Time (Between Coats) | Full Cure Time |
|---|---|---|---|---|
| Liquid Butyl Rubber | 50 sq. ft. | 1-2 | 12-24 Hours | 7 Days |
| Silicone Roof Coating | 50-70 sq. ft. | 1-2 | 4-6 Hours | 24-48 Hours |
| Waterproof Sealant | 15 sq. ft. | 3-4 | 6-8 Hours | 48-72 Hours |
| EPDM/TPO Primer | 250 sq. ft. | 1 | 1-2 Hours | N/A |
Always apply the final coat in the direction of the roof’s slope to facilitate proper water drainage.
Avoiding Common Application Mistakes and Post-Sealing Maintenance
Even with high-quality products, things can go wrong if you cut corners. Understanding why coatings fail is the best way to ensure your project is a resounding success. If you want to keep up with the latest tips, tricks, and industry news, bookmark our Tag Rubber Roof feed.
Why Coatings Fail: Bubbling, Peeling, and Adhesion Issues
The three most common failure modes for rubber roof coatings are bubbling, peeling, and adhesion failure.
- Trapped Moisture: If you coat over a damp membrane, or if there is moisture trapped in the insulation beneath the rubber, the sun will heat that moisture, turning it into water vapor. This vapor expands, creating large bubbles (blisters) that eventually pop and ruin the seal.
- Improper Cleaning: Applying coating over a layer of fine dust or chalky residue means the coating bonds to the dust, not the roof. It will quickly peel away.
- Skipping the Primer: EPDM is designed to resist chemical bonding. Without a dedicated EPDM primer, the coating simply cannot bite into the rubber.
- Applying Too Thick: Trying to save time by dumping the entire bucket and spreading it thick will trap uncured product beneath a cured top skin, leading to wrinkling and cracking.
To learn more about diagnosing and preventing these issues, check out our collection of expert articles under Tag Rubber Roofing.
Long-Term Aftercare and Inspection Schedules
Once your roof is successfully sealed, your job isn’t quite finished. To get the maximum lifespan out of your newly sealed system, you should establish a regular maintenance routine:
- Bi-Annual Inspections: Inspect the roof at least twice a year—ideally in the spring after the snow melts, and in the autumn before the first freeze.
- Clear the Drains: Keep all gutters, scuppers, and drains clear of leaves, twigs, and debris. Standing water is the enemy of any roof.
- Debris Removal: Gently sweep away loose dirt and debris that can trap moisture against the coating.
- Limit Foot Traffic: Rubber coatings are tough, but they can still be punctured by dropped tools or heavy foot traffic. If technicians need to service HVAC units, ensure they use designated walk-pads.
For commercial properties, having a professional team perform these inspections can save you thousands of dollars by catching minor issues before they turn into major leaks.
Cost Comparison: Professional Roof Coating vs. Complete Roof Replacement
For many commercial property owners in Wisconsin and Minnesota, the decision comes down to dollars and cents. Should you invest in sealing and restoring your current rubber roof, or bite the bullet and pay for a complete replacement?
Let’s look at a real-world comparison:
A complete commercial roof tear-off and replacement is a massive undertaking. It involves tearing off the old membrane, disposing of the materials (which incurs hefty landfill fees), replacing damaged insulation, and installing a brand-new membrane. This process is noisy, disruptive to your business, and can easily cost anywhere from $10 to $18 per square foot, depending on the complexity of the roof.
In contrast, a professional roof restoration using a high-solids silicone or liquid rubber coating system typically costs a fraction of that amount—often ranging from $4 to $8 per square foot.
Furthermore, because a coating is classified as maintenance rather than a capital improvement, it can often be fully tax-deducted in the year the work is completed. Add in the energy savings from a highly reflective white coating (which can lower roof surface temperatures by up to 50°F), and the return on investment becomes clear.
By choosing restoration, you avoid landfill waste, minimize disruption to your operations, and secure a leak-free system for up to 10 to 18 years—all at a fraction of the cost of replacement.
Frequently Asked Questions about Sealing Rubber Roofs
How long does a liquid rubber roof coating last?
When applied correctly over a properly prepared surface, a high-quality liquid rubber or silicone coating system can easily last 10 to 15 years. Many professional silicone systems can even be recoated when they eventually wear thin, extending the life of the roof almost indefinitely.
Can you apply rubber roof sealant in cold weather?
Most standard water-based liquid rubber coatings require temperatures above 50°F to cure properly. Applying them in cold weather will stop the curing process, leaving the coating vulnerable to being washed away by rain or snow. However, some specialized moisture-cure silicone products can be applied in cooler temperatures (down to 35°F), provided the surface is completely dry and free of frost.
Do I always need a primer before coating EPDM?
Yes. EPDM is a highly non-porous synthetic rubber that naturally resists adhesion. While some products claim to be self-priming, skipping a dedicated EPDM primer almost always results in long-term adhesion failure and peeling. Using a high-quality primer ensures a permanent chemical bond.
Conclusion
Sealing your commercial rubber roof is one of the smartest, most cost-effective decisions you can make to protect your building and your business. By taking the time to identify your membrane, clean the surface thoroughly, reinforce the seams, and apply a high-quality coating system, you can avoid the massive expense of a premature roof replacement.
At Yutzy Roofing Service, LLC, we specialize in helping commercial property owners across Wisconsin—including Madison, Appleton, Wausau, and Fond Du Lac—restore and protect their low-slope roofing systems. We are proud to offer an up to 18-year non-prorated renewable warranty on our commercial roof restorations, giving you total peace of mind for decades to come.
If you are ready to stop chasing leaks and protect your investment with a professional commercial roof restoration, we are here to help. Explore our specialized services and learn how we can help you by reading about Rubber Roofing Repair Renewing and Reinforcing Your EPDM Roofing System, or contact our team today to schedule your professional roof inspection!
