What’s Actually Causing Your Flat Rubber Roof to Leak — and How to Stop It
Knowing how to fix a leaky flat rubber roof can save your business thousands of dollars in water damage, disrupted operations, and premature roof replacement. Here’s a quick answer to get you started:
How to fix a leaky flat rubber roof (quick steps):
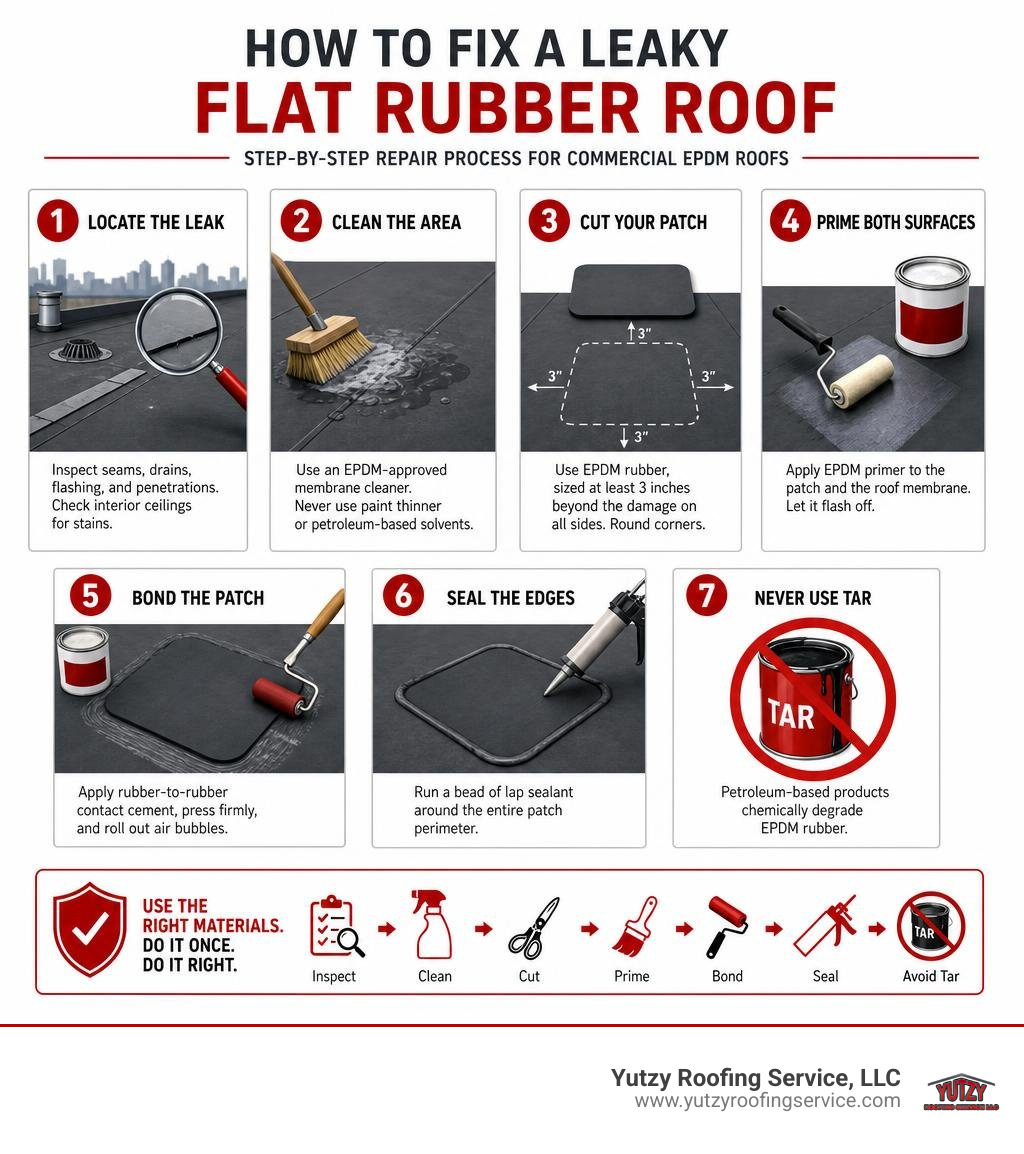
- Locate the leak — inspect seams, drains, flashing, and penetrations; check interior ceilings for stains
- Clean the area — use an EPDM-approved membrane cleaner; never use paint thinner or petroleum-based solvents
- Cut your patch — use EPDM rubber, sized at least 3 inches beyond the damage on all sides, with rounded corners
- Prime both surfaces — apply EPDM primer to the patch and the roof membrane; let it flash off
- Bond the patch — apply rubber-to-rubber contact cement, press firmly, and roll out air bubbles
- Seal the edges — run a bead of lap sealant around the entire patch perimeter
- Never use tar — petroleum-based products chemically degrade EPDM rubber
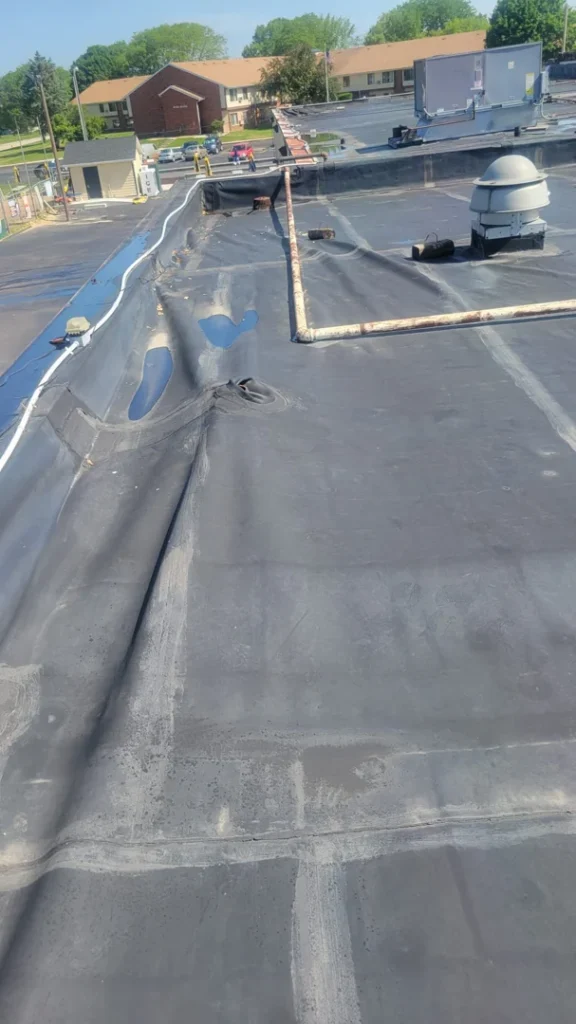
Flat rubber roofs — most commonly made from EPDM (ethylene propylene diene monomer) — are built to last up to 30 years with proper maintenance. But Wisconsin’s harsh freeze-thaw cycles, summer heat, and heavy precipitation put these roofs under constant stress. Seams separate. Flashing pulls away. Drains clog. And what starts as a small drip can quietly rot the insulation and deck beneath your feet before you even notice a ceiling stain indoors.
Here’s the critical thing most property owners miss: the wet spot on your ceiling is rarely directly below the actual breach. Water travels horizontally across the membrane and through insulation before it finds a way inside — sometimes 10 to 15 feet away from the real entry point. That’s why random caulk or off-the-shelf sealant rarely solves the problem. It just buries the evidence.
I’m Josh Yutzy of Yutzy Roofing Service, LLC — our family has been repairing and restoring commercial flat rubber roofs across Wisconsin since 1995, and I’ve seen how a misdiagnosed leak or the wrong patch material can turn a $400 repair into a $4,000 section replacement. In this guide, I’ll walk you through exactly how to fix a leaky flat rubber roof the right way — and when it’s time to call in a professional before a small problem becomes a structural one.
Common Causes of Flat Rubber Roof Leaks

To solve a leak permanently, we first have to understand why it happened. While synthetic rubber membranes are incredibly tough, they aren’t completely invincible. Over decades of exposure to extreme weather, several common culprits tend to compromise their water-resistant performance.
- UV Degradation: Although modern EPDM has excellent resistance to solar radiation, decades of intense ultraviolet exposure will eventually dry out the membrane. This leads to micro-cracking, shrinkage, and a loss of the flexibility required to handle temperature swings.
- Membrane Punctures: Commercial flat roofs see their fair share of foot traffic. Whether it’s HVAC technicians dragging heavy equipment or windstorms throwing sharp branches onto the roof, small punctures and tears are bound to happen.
- Thermal Expansion: Wisconsin temperatures can swing dramatically between day and night. This constant expansion and contraction puts immense stress on the adhesive bonds of your roofing system.
Seam Failures and Flashing Issues
The vast majority of flat rubber roof leaks do not occur in the middle of the open membrane; they happen at the transitions. EPDM sheets are joined together using specialized seam tapes or liquid adhesives. Over time, adhesive degradation from water exposure and thermal movement causes these seams to slowly separate.
Similarly, the perimeter flashing and metal termination bars that secure the rubber sheet to walls, chimneys, and roof edges are highly vulnerable. If the sealant behind a termination bar dries out, rainwater will run straight down the wall and slide directly underneath your rubber membrane. For a deep dive into resolving these specific transition issues, you can read our detailed guide on Patching Things Up: A Guide to EPDM Flashing and Seam Repair.
Ponding Water and Drainage Blockages
Unlike sloped roofs that naturally shed water, flat roofing systems rely entirely on internal drains, scuppers, and gutters to clear away rain and melting snow. When these drainage systems become clogged with leaves, dirt, or windblown debris, water begins to pool.
Standing water (also known as ponding water) that remains on a roof for more than 48 hours is a major threat. Not only does it create constant hydrostatic pressure that forces water through the tiniest microscopic seam gaps, but the sheer physical weight of the ponding water can deflect the roof deck. This deflection creates a permanent low spot that collects even more water. Correcting these drainage issues often requires installing tapered insulation to create a positive slope toward your drains, or adding crickets to divert water around obstructions.
How to Locate a Leak on a Flat Rubber Roof

Finding the exact source of a leak on a flat rubber roof is often the most challenging part of the entire repair process. Because of water migration, gravity, and the horizontal layout of flat roofs, water can enter through a breach in one area, travel along a roof joist, and drip into your building fifteen feet away.
To trace the leak path accurately, we recommend using a systematic approach:
- Visual Inspection: Walk the roof on a dry day. Look closely for open seams, loose flashing, cracked sealant around pipe penetrations, and physical tears.
- Infrared Moisture Scanner: Professional commercial roofers use infrared thermography to locate trapped moisture within the insulation. Wet insulation retains heat longer than dry insulation, showing up clearly on a thermal scan after sunset.
- The Hose Test Simulation: If a visual inspection yields no clear culprits, you can simulate rainfall. Have one person stand inside the building to watch for drips while another uses a garden hose on the roof. Always start at the lowest point of the roof (usually near the drains) and slowly work your way up, soaking each section for 15 to 20 minutes before moving higher.
If you are dealing with active dripping inside your facility, make sure to take immediate protective measures. Check out our advice on managing indoor water issues in Stop the Drip: A Guide to Interior Roof Repairs.
Tracing Water Travel Indoors
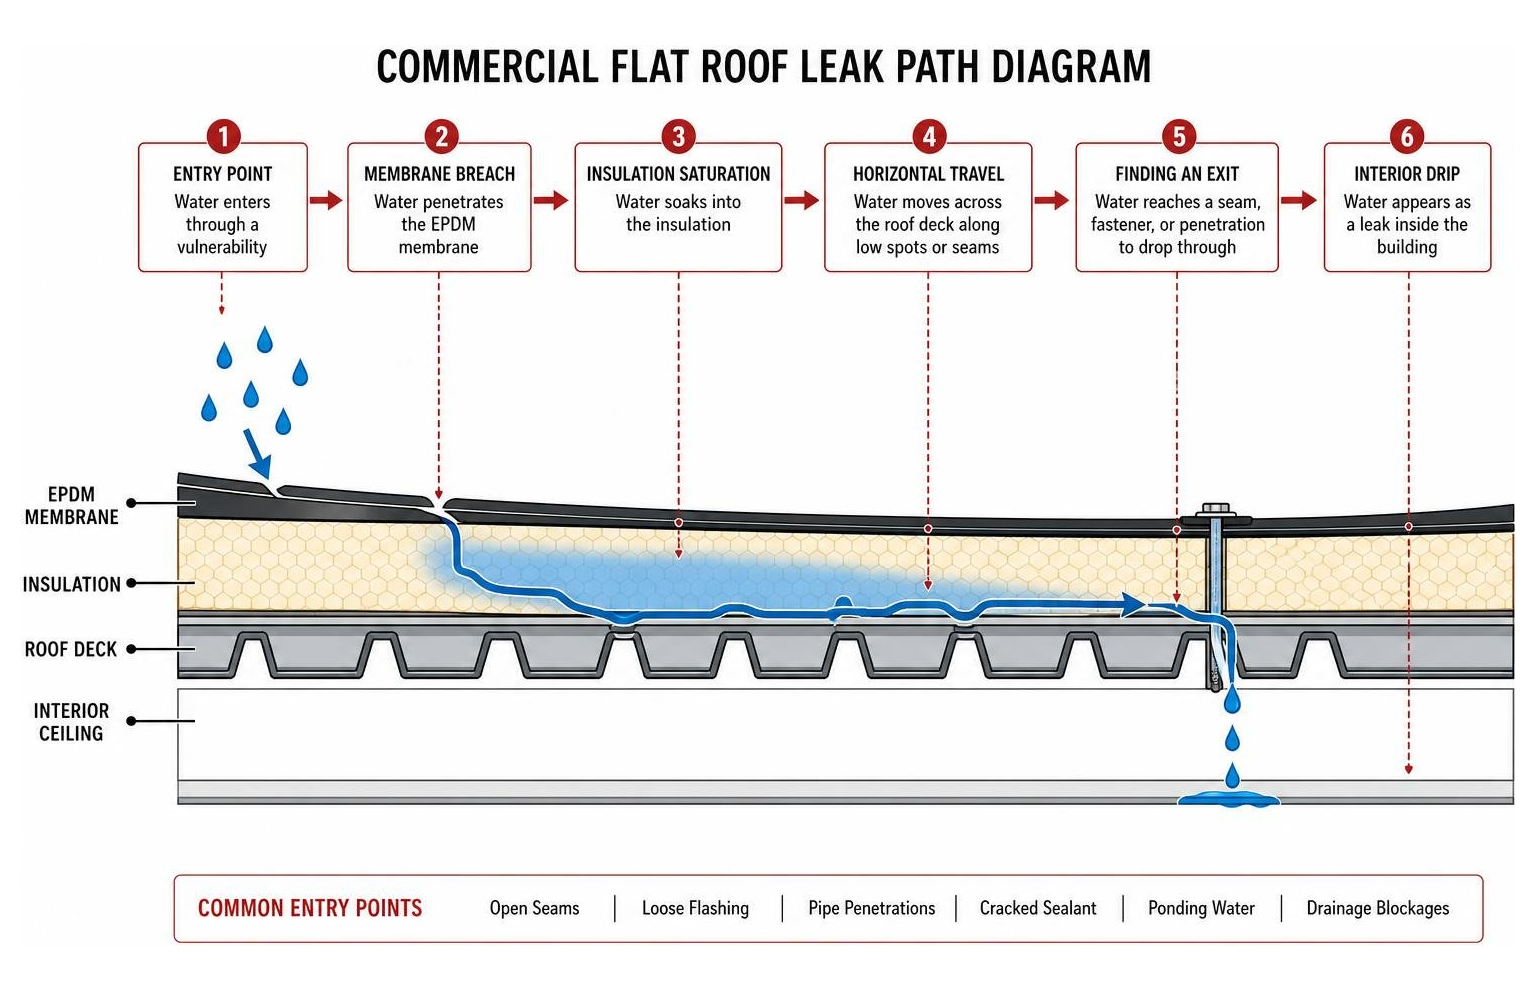
When water breaches the EPDM membrane, it immediately saturates the high-density fiberboard or polyisocyanurate insulation boards underneath. Once the insulation is full, the water pools on the metal or wood deck until it finds a seam, screw hole, or utility penetration to drip through.
This horizontal travel behaves much like a subway map — the water boards the train at the roof tear (the station) and travels along the deck before finally exiting at a ceiling tile. When tracking this path:
- Document the exact location of all ceiling stains, damp insulation, and mold growth.
- Measure the distance from the interior walls to the drip point, then map those same dimensions on the roof surface.
- Always inspect the area directly “upstream” (following the subtle slope of the roof) from your measurements.
How to Fix a Leaky Flat Rubber Roof: The Essential DIY Repair Steps
If you have located a small puncture, tear, or minor seam separation, you can perform a highly effective repair yourself. However, single-ply rubber membranes are unforgiving when it comes to poor preparation. To ensure your repair survives the next severe storm, you must follow the correct chemical preparation and physical application steps.
First, clean the repair zone thoroughly. EPDM naturally produces a black carbon dust as it ages. This dust, combined with environmental dirt and pollen, will completely block adhesives from bonding. Scrub the area with a specialized EPDM membrane cleaner and a stiff-bristle brush, then wipe it down with a clean white rag dampened with acetone. Never use colored rags, as the solvent can cause the fabric dye to bleed onto the rubber, ruining your adhesion.
For a comprehensive overview of the repair process, take a look at our article on DIY Rubber Roof Repair Made Easy.
Essential Tools and Materials for How to Fix a Leaky Flat Rubber Roof
Before you begin, gather all the proper commercial-grade materials. Do not try to substitute standard construction adhesives or hardware-store caulk. You will need:
- An EPDM rubber patch (either uncured flashing tape or a cured EPDM patch)
- EPDM membrane cleaner and clean white cotton rags
- EPDM primer (crucial for activating the rubber surface)
- Rubber-to-rubber contact cement or splice adhesive
- A heavy-duty hand seam roller
- EPDM lap sealant and a caulk gun
- A utility knife and a pair of heavy shears
Using high-quality materials is the single best way to ensure your patch doesn’t peel up in a few months. For a list of recommended products, read our guide on Top Products to Fix Your Leaky Rubber Roof.
Step-by-Step Patching: How to Fix a Leaky Flat Rubber Roof
Follow this step-by-step method to apply a professional-grade patch:
- Prep the Substrate: Clean and prime the repair area, extending the primer at least 3 inches past where the patch will sit.
- Cut the Patch: Cut your EPDM patch so that it overlaps the damaged area by at least 3 inches in every direction. Crucial Step: Use your shears to round all the corners of the patch. Square corners have sharp 90-degree edges that easily catch on debris or lift during thermal expansion; rounded corners distribute stress evenly and prevent peeling.
- Apply Primer: Apply EPDM primer to both the roof membrane and the back of the patch. Let it “flash off” (dry until it is tacky to the touch but does not transfer to a clean finger).
- Adhere the Patch: Carefully lay the patch over the tear. Avoid stretching the rubber, as stretched rubber will eventually shrink and pull away.
- Roll the Seam: Use your hand seam roller to roll the patch firmly. Start from the center and roll outward in all directions to force out any trapped air bubbles and ensure 100% adhesive contact.
- Seal the Perimeter: Apply a continuous bead of EPDM lap sealant around the entire edge of the patch. This protects the cut edge of the rubber from moisture infiltration.
Why You Must Avoid Tar and Asphalt-Based Products
If there is one absolute rule of EPDM roof repair, it is this: never use tar, asphalt, or petroleum-based products on a rubber roof.
Many well-meaning property owners run to the local big-box store and buy a can of cheap black plastic roof cement to smear over a leak. This is a catastrophic mistake. EPDM is a synthetic rubber that is chemically incompatible with petroleum. When petroleum-based products touch EPDM, a severe chemical reaction occurs. The rubber absorbs the oils, causing it to bloat, swell, wrinkle, and lose all structural integrity. Over time, the rubber will literally liquefy into a sticky, useless mush.
Once a rubber roof has been contaminated with tar or asphalt, the damage is permanent. You cannot simply wipe the tar off and apply a proper rubber patch over it; any new rubber touching the contaminated area will also degrade. The only solution is to completely cut out the contaminated section of the roof and replace it with fresh membrane.
| Feature | EPDM-Compatible Adhesives / Sealants | Petroleum-Based Tar / Asphalt Patches |
|---|---|---|
| Chemical Compatibility | 100% compatible with single-ply EPDM | Highly incompatible (causes chemical breakdown) |
| Membrane Reaction | Bonds seamlessly without altering structure | Causes bloating, wrinkling, and liquefaction |
| Lifespan | Long-term seal matching the membrane’s life | Fails within months, ruins surrounding rubber |
| Warranty Status | Preserves manufacturer & applicator warranties | Instantly voids warranties; requires cut-out replacement |
When to Call a Professional for Flat Rubber Roof Repair
While a small puncture is a straightforward DIY project, there are clear limits to what can be safely and effectively repaired without professional equipment. Attempting to tackle major structural issues on your own can lead to expensive mistakes, safety hazards, and voided warranties.
We highly recommend calling in a professional commercial roofing contractor if you encounter any of the following situations:
- Widespread Damage: If more than 25% of your flat roof membrane is showing signs of cracking, blistering, or seam separation, spot patching is no longer cost-effective.
- Saturated Insulation and Deck Rot: If the insulation beneath the membrane feels spongy, soft, or holds water like a sponge, the roof deck itself may be rotting. This requires removing the damaged sections, replacing the structural decking, and installing new insulation before laying down a new membrane.
- Failed Penetrations and Complex Flashing: Repairing leaks around commercial HVAC curbs, large exhaust vents, or complex parapet walls requires specialized commercial flashing details and termination techniques.
- Warranty and Code Compliance: Commercial properties must comply with strict local building codes and wind uplift ratings. Furthermore, unauthorized DIY repairs can instantly void your existing manufacturer warranty.
If you suspect your roof’s issues are too large for a simple DIY patch, you can learn more about professional options in our Flat Commercial Roof Repair Guide.
Frequently Asked Questions about Flat Rubber Roof Repairs
Can I use liquid coatings to fix widespread flat rubber roof leaks?
Yes, high-quality liquid coatings are an exceptional way to restore a weathered flat rubber roof without the massive expense of a complete tear-off. Liquid butyl rubber, silicone, and acrylic coatings chemically bond to the existing EPDM membrane, sealing hairline cracks and reinforcing worn areas. A professionally applied silicone coating can extend your flat roof’s lifespan by up to two decades while reflecting solar heat to lower your cooling costs.
However, you must strictly follow manufacturer application guidelines. The roof must be completely clean, dry, and primed with an EPDM-specific primer to ensure proper adhesion. For a comparison of your coating options, read our analysis of Rubber Roof Sealant vs Coating: Which One Wins.
How long does a DIY flat rubber roof patch last?
A DIY patch applied with proper preparation, rounded corners, EPDM primer, and commercial-grade contact cement can last for several years. However, DIY patches are highly susceptible to the intense thermal stress of Wisconsin’s changing seasons. Because DIYers often lack the heavy-duty weighted rollers and commercial-grade primers used by professional crews, these patches should generally be viewed as temporary or medium-term mitigation rather than a permanent 30-year solution.
What is the cost difference between DIY and professional rubber roof repair?
A DIY repair for a small tear or seam separation typically costs between $50 and $300 for materials (EPDM patch kit, primer, and sealant) and takes about 2 to 4 hours of your time.
In contrast, professional repairs for simple patches run $200 to $400, while major seam restorations or flashing repairs cost $800 to $1,500+. While the upfront cost of a professional repair is higher, it includes experienced labor, proper safety equipment, commercial-grade materials, and—most importantly—a professional warranty that protects your commercial asset.
Conclusion
Taking care of your commercial flat rubber roof doesn’t have to be an overwhelming chore. By understanding how to fix a leaky flat rubber roof, identifying the signs of wear early, and avoiding destructive materials like tar, you can keep your building dry and secure.
But when the leaks are widespread, the insulation is wet, or you simply want the peace of mind that comes with professional workmanship, we are here to help. At Yutzy Roofing Service, LLC, we specialize in commercial roofing restoration, EPDM repairs, and advanced spray foam coatings. We proudly serve businesses throughout Wisconsin — including Madison, Appleton, Wausau, and the surrounding areas — offering an industry-leading up to 18-year non-prorated renewable warranty on our restoration systems.
Don’t let a minor drip turn into a major structural headache. If you’re ready to secure your commercial property with a long-term, hassle-free solution, fix your flat roof without getting buried in gravel and contact our team today!
