
Rubber Membrane Repair Starts With a Fast, Dry Fix
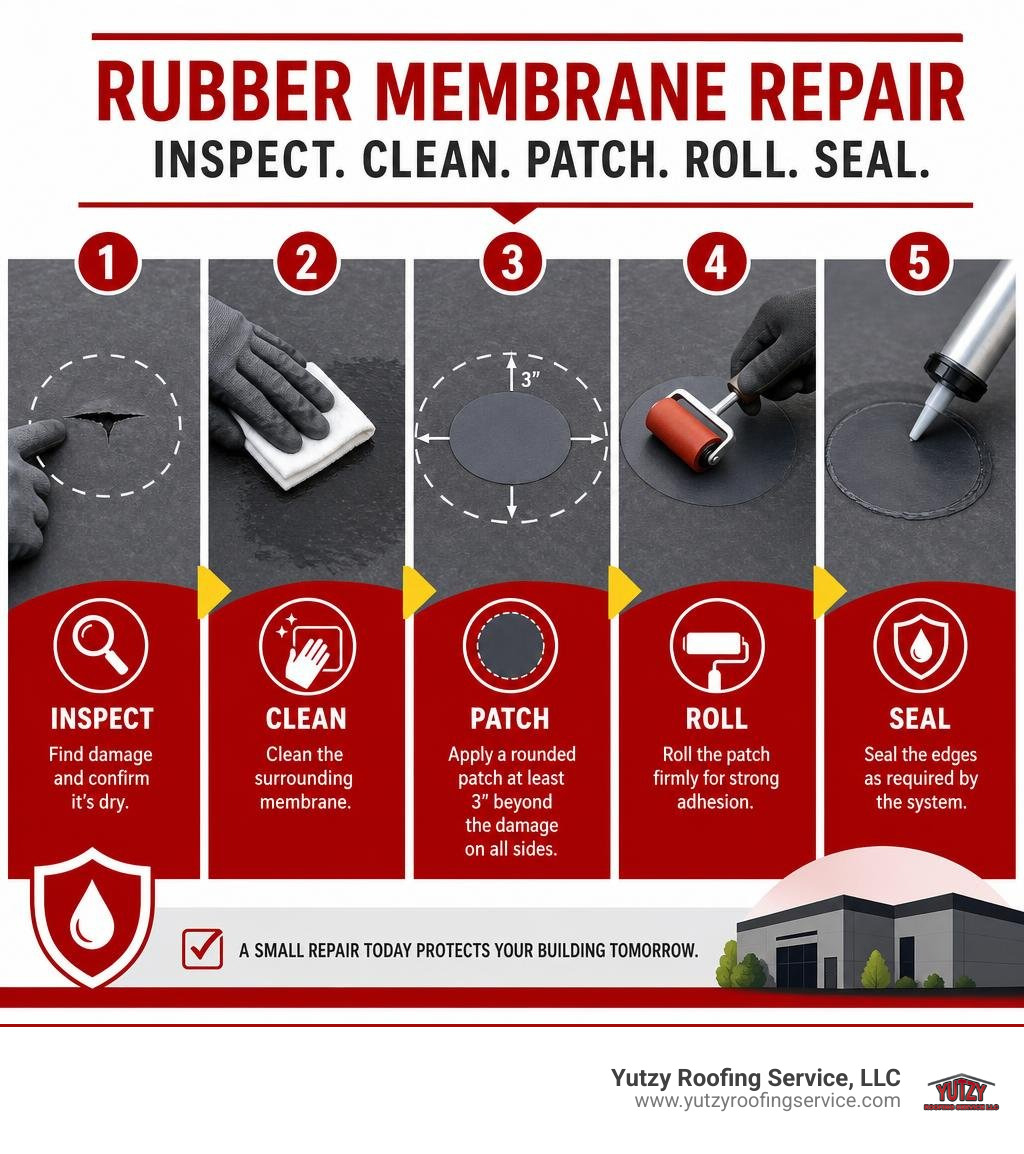
Rubber membrane repair is the process of finding a leak in an EPDM roof, cleaning the membrane, and sealing small punctures, tears, seams, or flashing defects with compatible patch material. For a small, dry, localized problem, the basic approach is simple:
- Find the damage and confirm the membrane is dry.
- Clean the surrounding EPDM with a membrane-safe cleaner.
- Apply a rounded patch that extends at least 3 inches beyond the damage on every side.
- Roll the patch firmly and seal its edges as required by the repair system.
A pinhole, split seam, or damaged flashing detail can let water move beneath the membrane and into a commercial building long before the visible ceiling leak appears. Wisconsin’s freeze-thaw cycles, summer heat, standing water, and rooftop traffic can all turn a small weak spot into a costly interruption.
The right repair product matters. EPDM needs compatible cleaner, primer or adhesive when specified, self-adhering repair membrane, and lap sealant – not a random caulk or coating that may fail to bond. A good patch is only as reliable as the preparation beneath it.
I’m Josh Yutzy of Yutzy Roofing Service, LLC. Our family roofing business has served Wisconsin since 1995, and our experience with Rubber membrane repair helps commercial property owners choose practical repairs that protect their buildings without unnecessary tear-offs.
Handy Rubber membrane repair terms:
Identifying EPDM Membrane Damage and Essential Tools
Before picking up a trowel or opening a tube of lap sealant, you must identify where water is entering your low-slope roofing assembly. Water on a flat roof rarely drops directly straight down into the interior space. Water can creep 20 to 30 feet along subsurface insulation joints or metal roof decks before dripping through a ceiling tile. Following a proven checklist of How to Repair Rubber Roofing in 6 Easy Steps saves hours of searching.
Spotting Common EPDM Roof Leaks
Finding the exact source of a leak on a smooth or ballasted EPDM (ethylene propylene diene monomer) roof requires systematic inspection. Common problem areas include:
- Physical Punctures and Cuts: Dropped HVAC panel screws, sharp tool edges, flying storm debris, or heavy foot traffic can easily puncture an EPDM membrane. Even a tiny pinhole can take in gallons of water over time during heavy rainstorms.
- Split or De-laminated Seams: Over years of thermal expansion and contraction, factory or field seam adhesives can dry out, weather, or degrade. Look for open gaps, bubbling seam tape, or curled edges along the lap joints.
- Perimeter Flashing and Penetrations: Skylight curb perimeters, pipe boots, drain sumps, and parapet wall flashings undergo extreme physical stress. Failed caulking at termination bars or cracked wall flashing sheets are leading entry points for water.
- Water Ponding Areas: Depressions that hold standing water for longer than 48 hours accelerate oxidation, gather dirt deposits that weaken adhesives, and apply constant hydrostatic pressure to any minor seam defect.
Essential Tools and Materials for Patching
Executing a durable rubber membrane repair requires the correct commercial materials. Using residential materials like asphalt roof cement or standard hardware silicone will destroy EPDM rubber by leaching out plasticizers, causing the membrane to swell, wrinkle, and crack.
Here is the essential toolbox you need for a standard field repair:
- Cleaning Materials: Multipurpose membrane cleaner, Splice Wash (SW-100), or pure acetone, combined with lint-free white cotton rags and scrub pads.
- EPDM Primer / Splice Adhesive: Specialized solvent-based EPDM primer (such as QuickPrime Plus) that creates a sticky, chemically active bonding layer.
- Repair Membrane: Cured or uncured EPDM repair membrane rolls (typically 6-inch x 25-foot or 12-inch x 25-foot rolls) or self-adhering cover strips.
- Pressure Roller: A heavy-duty 2-inch steel or hard rubber seam roller to eliminate air pockets and activate pressure-sensitive tapes.
- Perimeter Sealant: Heavy-bodied EPDM lap sealant designed specifically for single-ply membrane perimeters.
- Cutting Tools: Heavy-duty shears or utility knives for trimming membrane sheets with clean, smooth cuts.
Step-by-Step Rubber Membrane Repair Process
A professional rubber membrane repair relies entirely on surface preparation and chemical bonding. EPDM is an inert synthetic rubber—nothing sticks to it permanently unless the carbon black and factory weathering film are completely stripped away.
Preparing the Surface for a Rubber Membrane Repair Patch
Never apply patch materials over dusty, oxidized, or wet rubber membranes. Follow this rigorous surface preparation sequence:
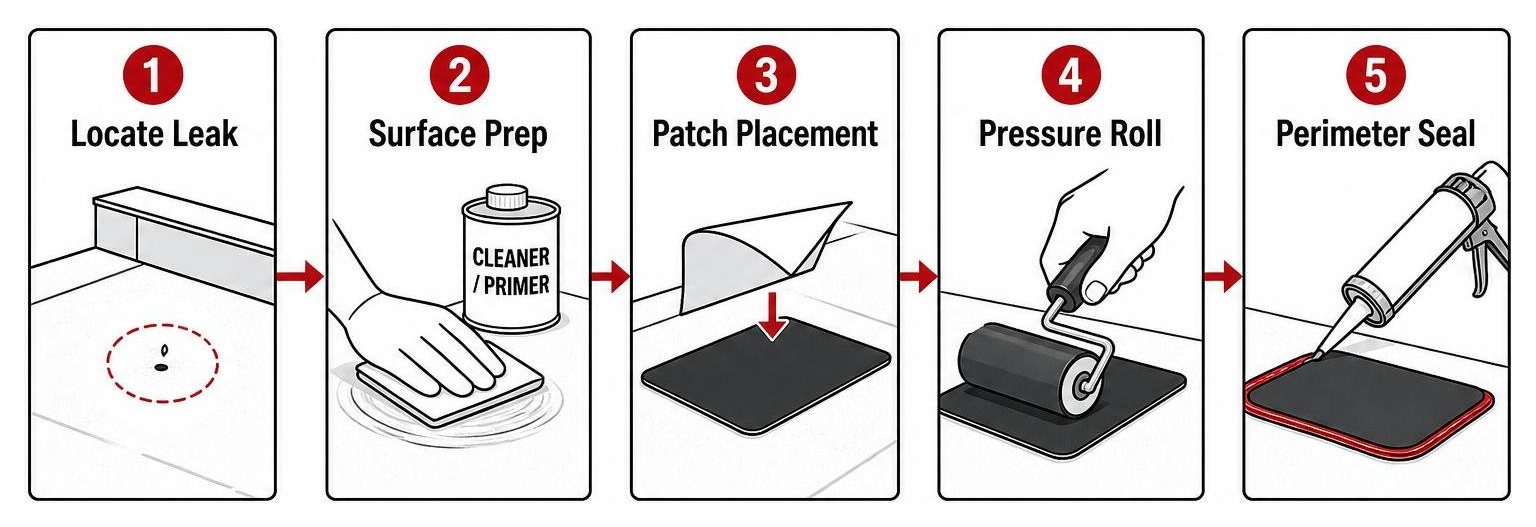
- Scrub and Wash: Wash the repair zone with warm soapy water or dedicated multipurpose cleaner to remove heavy mud, leaf litter, and chalky surface oxidation. Rinse thoroughly with clean water and let dry completely.
- Solvent Cleaning: Clean at least 6 to 8 inches around the damaged area using a white rag soaked in EPDM splice cleaner or acetone. Scrub until the rag comes away clean and the EPDM membrane returns to a dark, uniform black color.
- Apply Splice Primer: Apply a uniform layer of EPDM primer centered over the damage using a scrub applicator pad. Extend the primer at least 3 inches past where the edges of the patch will sit.
- Check for Tackiness: Allow the primer to flash off (usually 5 to 15 minutes depending on ambient temperature and humidity). Test the primed surface with a clean finger—it should feel tacky to the touch without transferring liquid primer to your skin.
For specific manufacturer warranty requirements, refer to technical guides like the Technical Notes – Elevate Warranty Repair Guide, which outline certified single-ply standards. Reviewing Top Products to Fix Your Leaky Rubber Roof can also help you choose commercial-grade products.
Applying and Sealing a Self-Adhering Patch
Once the primed surface is properly tacky, execute the patch installation with care:
- Size and Cut the Patch: Measure the cut or puncture. Cut your EPDM patch material so that it extends at least 3 inches (76 mm) beyond the defect in every direction. For a simple pinhole leak, the absolute minimum patch size is 6 inches by 6 inches.
- Round the Corners: Always cut all four corners of the patch into rounded curves (with a minimum 1-inch radius). Sharp 90-degree corners create stress concentration points that catch wind, peel up over time, or snag on foot traffic.
- Peel and Position: If using self-adhering membrane, let the patch material relax in direct sunlight for 30 minutes before installation to remove factory curl. Peel back the protective release liner at a low, 45-degree angle parallel to the roof to prevent air pockets from trapping under the patch.
- Roll Firmly: Center the patch over the damage and lay it down smoothly. Take a steel or rubber seam roller and apply heavy pressure, starting from the center of the patch and working outward toward the edges. This rolls out trapped air pockets and fully engages the pressure-sensitive adhesive.
- Apply Lap Sealant: Apply a continuous 1/4-inch to 3/8-inch bead of EPDM lap sealant over the entire outer perimeter edge of the patch. Feather the edges of the lap sealant with a small trowel to ensure water drains smoothly across the seam without pooling.
Rubber Membrane Repair Kits vs. Standalone Materials
Building owners and maintenance directors often ask whether to purchase a pre-packaged repair kit or buy standalone commercial components. Both options have their place depending on the scale and urgency of the leak.
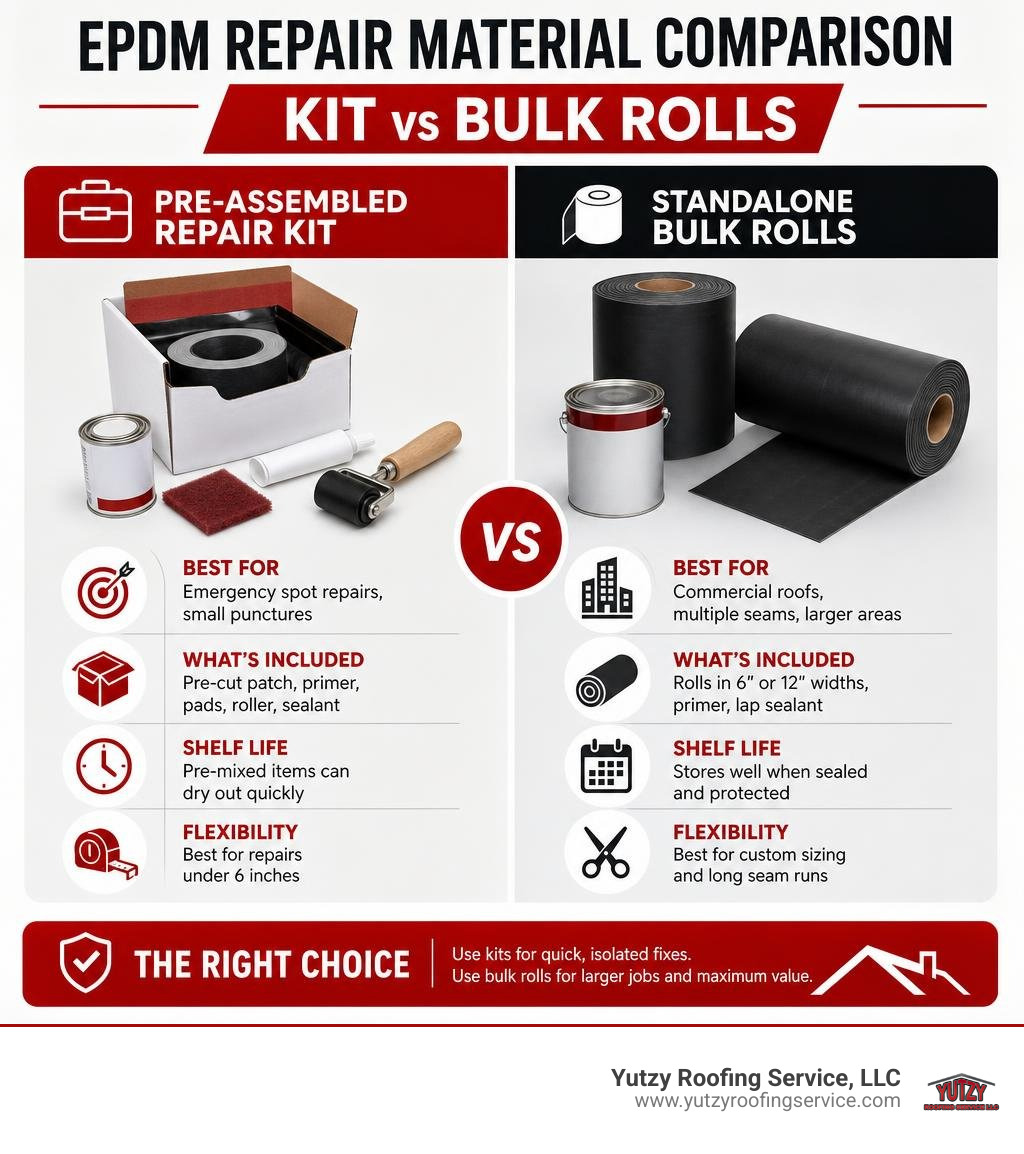
| Criteria | Pre-Assembled Repair Kits | Standalone Bulk Components |
|---|---|---|
| Primary Target | Emergency spot repairs, small punctures, remote sites | Commercial building roofs, multiple seam issues |
| Typical Cost Range | $150 – $190 per kit | Variable ($80–$220+ per roll, plus primers & cleaners) |
| Included Materials | Pre-cut tape/flashing, cleaner, pads, roller, lap sealant | Separate 6″ or 12″ x 25′ rolls, gallon primer, lap sealant |
| Shelf Life Concerns | Pre-mixed primers and small tubes dry out quickly after opening | Bulk primers and tape rolls store well if sealed tightly |
| Flexibility & Sizing | Best for repairs under 6 inches | Best for continuous seams or extensive custom flashing |
Choosing Between Pre-Assembled Kits and Custom Components
Pre-assembled patch kits (such as QuestMark or Dicor repair kits, priced from $160 to $190) are convenient options for maintenance teams dealing with isolated rooftop punctures. They include pre-cut 6-inch cover strips, scrub pads, small primer tins, and seam rollers in one box.
However, purchasing bulk components—such as a 12-inch x 25-foot roll of EPDM membrane ($189.95 MSRP) or 6-inch x 25-foot repair rolls ($81.75)—is far more cost-effective when repairing multiple split seams or larger areas across commercial roof decks. Custom components allow you to cut precise shapes and cover longer seam lengths without adding unnecessary butt joints. Read more about selecting materials at Rubber Roofing Repair Renewing and Reinforcing Your EPDM Roofing System.
Avoiding Critical Mistakes in Rubber Membrane Repair
To guarantee a long-lasting leak repair, avoid these frequent installation mistakes:
- Using Incompatible Sealants: Applying asphalt plastic cement, residential silicone, or polyurethane caulks to EPDM single-ply rubber causes severe rubber distortion and immediate bond failure.
- Skipping the Primer: Never stick self-adhering tape or flashing directly onto unprimed EPDM rubber. The repair may hold for a few weeks, but moisture and thermal cycling will cause it to lift off completely.
- Creating Butt Joints: Never overlap patch strips end-to-end or side-to-side with butt joints to try to cover a large damaged area. Butt joints create water channels that trap rain and fail rapidly under hydrostatic pressure.
- Square Corners: Leaving sharp, square corners on repair patches causes edge lifting under heavy wind loads or ice accumulation during Wisconsin winters.
- Trapping Moisture: Patching over damp insulation traps water inside the roof assembly, causing deck corrosion, rot, mold, and hidden ceiling collapse.
Knowing When Spot Repairs Fail: Patching vs. Full Restoration
While spot patching works wonders for isolated punctures or minor mechanical cuts, patching has strict technical limits. Continuing to apply patch upon patch to a failing, aged EPDM membrane is money wasted.
Assessing Damage Severity on Commercial Membranes
According to commercial roofing industry standards (including the Elevate warranty specifications), spot repairs are no longer adequate under the following conditions:
- High Puncture Density: If an EPDM roof has more than six punctures in any 100-square-foot area, standard practice requires overlaying the entire 100-square-foot area with new membrane rather than applying isolated patches.
- Saturated Subsurface Insulation: If water has entered the insulation boards beneath the rubber membrane over a wide area, the insulation loses its structural strength and thermal R-value. Trapped water boils under summer heat, creating massive air blisters that tear field seams apart.
- Large Tears or Shrinkage: Unreinforced EPDM rubber can shrink up to 10% over its service life. When tension pulls the membrane off parapet walls or creates tears longer than 5 feet, simple spot patches cannot withstand the stress. For tears exceeding 5 feet, existing membrane scoring and continuous overlay strips are mandatory.
- Extensive Surface Micro-Cracking: Aged EPDM membranes exposed to decades of intense ultraviolet radiation develop widespread alligatoring and micro-cracking. Once the surface integrity degrades completely, patches will simply pull away from the brittle substrate.
To learn more about liquid application details and membrane limits, consult the Liquid Rubber Flat and Low Slope Roofs Application Guide or read our overview on How Rubber Roof Experts Can Save Your Commercial Property.
The Role of Professional EPDM Restoration
When a rubber membrane shows widespread seam failures or surface aging but the roof deck and insulation remain structurally sound, fluid-applied roof restoration is the smartest choice.
Instead of an expensive, disruptive roof tear-off, professional restoration involves thoroughly cleaning the roof surface, reinforcing every seam and penetration with heavy-duty fabric and liquid elastomeric sealant, and applying a thick, seamless liquid rubber or elastomeric coating topcoat.
Our restoration coatings convert your old, multi-seam EPDM membrane into a monolithic, joint-free, waterproof shield. Benefits include:
- Up to 18-Year Non-Prorated Renewable Warranties: Full coverage protection that can be renewed with a simple refresher coat down the road.
- Significant Energy Savings: Bright white elastomeric coatings reflect up to 85% of solar radiation, reducing rooftop temperatures and cooling costs during humid summer months.
- Zero Facility Disruption: Your business continues running normally without noisy tear-offs, dust, or weather exposure risks.
Frequently Asked Questions About Rubber Membrane Repair
How large should an EPDM repair patch be compared to the damage?
An EPDM repair patch must extend a minimum of 3 inches (76 mm) past the outer perimeter of the damage in all directions. For example, if you are repairing a 1-inch tear, the patch should measure at least 7 inches across (1 inch tear + 3 inches overlap on the left + 3 inches overlap on the right).
For tiny pinholes, the minimum allowable patch size is 6 inches by 6 inches. Always round all four corners of the patch with a minimum 1-inch radius to prevent wind uplift and catching.
What temperatures are required for rubber membrane repair?
For ideal adhesion, temperature and moisture levels matter:
- Liquid Coatings & Sealants: Apply when ambient and surface temperatures are between 50°F and 86°F (10°C to 30°C). Relative humidity must be below 80%, and the roof surface temperature must be at least 5°F above the ambient dew point to prevent micro-condensation on the rubber.
- Self-Adhering Tapes and Primers: Can be applied down to 40°F, but tapes become stiffer and require longer tack/flash-off times. Always let self-adhering EPDM patch rolls relax in direct sunlight for at least 30 minutes before installation to make them soft and pliable.
- Weather Window: Ensure at least a 6 to 8-hour completely dry window before dew, fog, or rain hits the curing adhesives or sealants.
Can you use standard silicone or caulk to fix an EPDM leak?
No. Standard hardware store silicone, clear caulk, or asphalt mastic should never be used for EPDM rubber repairs. Silicone forms a temporary surface bond that splits away under thermal expansion, while asphalt and petroleum-based products chemically dissolve EPDM rubber, turning the membrane into a soft, sticky, gummy mess.
Additionally, rubberized paste sealants like Gorilla Waterproof Patch & Seal Paste (which operates from -40°F to 212°F and cures in 24–48 hours) are suitable for gap-filling up to 3 inches on general surfaces, but they are not recommended for high-plasticizer rubbers or as a replacement for cured EPDM cover strips on primary field seams. Always use specialized EPDM splice primers, self-adhering EPDM tapes, and commercial EPDM lap sealants.
Conclusion
A well-executed rubber membrane repair can stop active building leaks quickly and save commercial property owners from interior water damage. By understanding the core mechanics of EPDM restoration—deep surface cleaning, solvent-based priming, rounded 3-inch patch margins, thorough seam rolling, and proper perimeter lap sealing—facility managers in Madison, Appleton, Wausau, and across Wisconsin can easily tackle minor rooftop punctures.
However, when patch count grows, seams peel open across large areas, or underlying insulation absorbs water, temporary spot fixes are no longer enough. Liquid rubber coating restoration offers a seamless, highly reflective waterproofing barrier backed by our non-prorated warranties up to 18 years.
Do not wait for the next storm to flood your commercial facility. Contact us at Yutzy Roofing Service, LLC today to schedule a roof inspection and learn about professional EPDM roof restoration solutions tailored specifically for your building.
